Tuesday, December 22, 2009

Laughing Lemon: November

My friends and I attended another "What's In Season" class from Laughing Lemon in November. As always, it was extremely informative and the food delicious. Thanks Jack and Silvia!

Some things I learned:

- soaking sliced brussel sprouts in water for about an hour before cooking makes them taste so much better. Anise or fennel make them taste milder and also aid digestion.
- persimmon: you can simply press the soft ones through a sieve and have an instant sauce. Yum!
- soaking cavelo nero (black kale) in salted water makes the tiny white moths fall off


lots of funky roots to try: ugly but tasty


my cooking friends getting their hands dirty


loads of butter for frying...


frying up potato cakes in the aforementioned enormous amount of melted butter


potato cakes all puffed up after a few minutes in the oven


salsify, aka "winter asparagus"


salad with persimmon, feta, red onion, pine nuts, and vanilla vinaigrette


main dish: roasted veggies, glazed salsify, kale and potato cake


pretty French style apple pie (with crème fraîche) for dessert

Thursday, October 29, 2009

improving on the nie nie mud cake


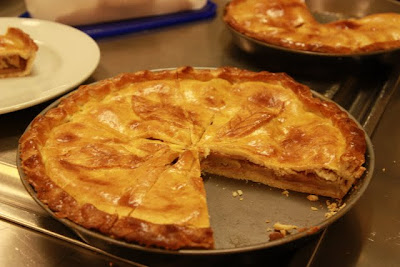
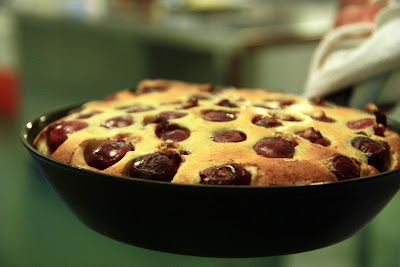
My friend suggested that I make Nie Nie's Mud Cake Magnifique by Tongue-n-Cheeky. And of course, I made it because I love special requests. The cake was delicious and not particularly complicated. But the recipe drove me a little crazy, what with the unusual ingredients (olive oil in a chocolate cake?) and lack of explanation for instructions that veered from the cake making norm. But despite this, the cake was a big hit and I've made it three times already.

With this experience, I do have a few improvements to suggest for the cake filling and frosting. The methods in the original recipe resulted in lumpy textures for me. It might have been user error, but regardless, the methods I've described below have given me better and more consistent results. I've also rewritten the recipes to include metric measurements so my local friends can easily make it. The original cake recipe can be found here.

Mud cake

This recipe uses a simple mixing method which make a lush, dense brownie-like cake. Don’t overthink it.

8 oz unsweetened chocolate (227 gr) - (or 5 oz/144 gr cocoa powder plus 4 oz/113 gr unsalted butter)
6 oz olive oil (3/4 cup, 177 ml)
14 oz sugar (2 cups, 397 gr)
4 oz powdered sugar (1 cup, 113 gr)
4 eggs
5 oz flour (1 cup, 142 gr)
3.4 oz cocoa powder (1/2 cup, 96 gr)
½ tsp salt
2 tsp baking powder (above 5000 feet altitude, only use 1 tsp)
½ tsp baking soda
8 oz buttermilk (1 cup, 237 mL) - (or 1 cup warm milk mixed with 1 TB lemon juice, let stand 10 mins to curdle before using)

1. Preheat oven to 375F (190C). Grease and dust with cocoa powder two 9in cake pans.
2. In double boiler, melt the chocolate and olive oil and mix until smooth. Take mixture off heat and bring to room temperature.
3. Meanwhile, beat both sugars and eggs until well creamed.
4. Add the room temperature chocolate mixture to the sugar mixture and beat a couple minutes.
5. Add remaining ingredients and mix until all ingredients are incorporated.
6. Pour batter into the prepared cake pans (approximately 27-28 ounces of batter into each pan).
7. Bake for 26-28 minutes, or just until center of cake springs back to the touch. Remove from oven. Allow to cool before inverting on a cooling rack and removing from pan.
8. Before layering cake, use a knife to gently cut away any uneven parts at the top or sides of the cake.


Some tips:
1 & 2. Line your cake pans with parchment paper so the cakes pop right out.
3. Use room temperature eggs. Take them from the fridge and let them sit 5 minutes in hot water before using.
4. Use magic cake strips around your cake pans to help them cook evenly and prevent the dome that has to be cut off.

Perfectly Smooth Chocolate Marscapone Cream Filling


The original recipe had you first whip the cold cream and cheese (you can't whip warm cream) then stir in the melted chocolate. This inevitably creates lumps of chocolate. Instead, the below method combines the chocolate and cream into a smooth ganache before whipping (a more traditional method used by every cookbook I own).

6.25 oz dark chocolate (60%), chopped (177 gr)
8 oz heavy cream (1 cup, 237 mL)
8 oz mascarpone (227 gr)
1.25 oz sugar (1/4 cup, 35 gr)

1. Place chocolate in a heat-proof bowl.
2. In a medium saucepan, bring the cream to a simmer.
3. Pour the hot cream over the chocolate and let it sit for a few minutes to melt the chocolate.
4. Stir the mixture until all the chocolate is melted and the mixture is smooth.
5. Stir in the sugar.
6. Chill until cold enough to whip, but not more than 1 hour (I read that if it gets too cold, the chocolate and cream will separate later).
7. Whip the ganache into soft peaks.
8. Stir in the marscapone.

You can use it immediately between the cakes or refrigerate for later use.

Dark Chocolate Ganache Frosting


original frosting: curdled texture and way too much sugar


better frosting with super smooth texture, whipped and unwhipped versions

I had a lot of problems with the original recipe – curdled texture, way too sweet, etc. The recipe below uses roughly the same ingredients as the original but employs a food processor method used by both The Cake Bible and Cook’s Illustrated that perfectly emulsifies the chocolate, cream, butter mixture. I’ve also drastically reduced the sugar, but of course, you can add more to taste

8 oz heavy cream (1 cups, 236 ml) – for denser, thicker frosting
~~~~ or ~~~~
16 oz heavy cream (2 cups, 473 ml) – for a lighter, fluffier frosting

11 oz dark chocolate (60%), chopped (312 gr)
2-4 oz powdered sugar (1-2 cups, 57-113 gr)
4 oz cold butter, cut into 8 pieces (113 gr)

1. Place chocolate in food processor.
2. In a medium saucepan, bring the cream to a simmmer.
3. With food processor running, pour hot cream over chocolate. Process until combined, a minute or two.
4. Stop processor and add powdered sugar. Process until combined, about 1 minute.
5. With processor running, drop the butter pieces in through the feeding tube. Wait until the butter is combined before dropping in the next piece. Let the mixture process about 1 minute after all butter has been combined.
6. Now some options:
• If you used 8oz cream, you can cool the frosting to room temperature (about 1 hour) then frost the cake. The frosting will shiny and thick.
• If you used 8oz cream and prefer a lighter color and fluffier texture, chill the mixture until cold (about 1-2 hours) then whip until thick and spreadable. Do not overwhip or it will curdle!
• If you used 16 oz cream, you must chill the mixture until cold (1-2 hours) then whip until thick. Do not overwhip or it will curdle!


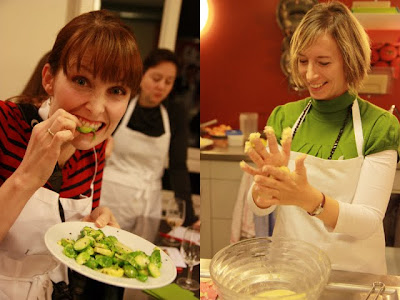
it's nice to have a friend to eat the extra batter

Tuesday, August 25, 2009

pretty summer soup


Back when I lived in California, I never felt the seasons come and go and I barely noticed when items like nectarines or summer squash arrived or disappeared from the shelves. Almost everything was available all the time. But in Zurich, I'm in a constant panic, buying much more produce that our small family can possibly consume, worried that some item will suddenly disappear, not to be dreamt of for months.

To help us consume the mountains of produce crowding me out of my kitchen, I've been trying lots of new veggie recipes. Soup might seem silly choice for summer. But I like it because I can cook it quickly in the cool morning, spend all day at the lake, then come home to an "instant" meal that tastes even better than when I made it fresh. My husband made it extra special with his fancy toothpick skills. It seemed a bit much for a meal that would be eaten on a shared TV tray at 10pm while we watched Entourage. But that's summer.


Curried Yellow Squash Soup with Cilantro-Lime

from A Year in a Vegetarian Kitchen by Jack Bishop

You may be tempted, as I was, to skip the cilantro-lime puree. The soup is yummy without it. But the puree makes the flavors pop and it's so darn pretty. Just do it.

1. In a large sauce pan over medium-high heat, heat until shimmering:
          2 TB olive oil

2. Add and cook until golden brown, about 8-10 minutes:
          1.5 pounds yellow squash, chopped
          1 medium onion, chopped

3. Add and cook until fragrant, about 1 minute:
          1 TB gingerroot, minced
          3 medium garlic cloves, minced
          2 tsp curry powder

4. Add and bring to boil:
          6 cups broth
          1 medium russet potato (about 8 oz), peeled and diced
          1/2 tsp salt, or to taste

5. Reduce heat to medium low and simmer until the potato is very tender, about 25 minutes.

6. Puree the soup in batches in blender until very smooth. Adjust the seasonings. You can serve it warm or chilled (refrigerate for several hours before serving). The original recipe suggest chilled, but I prefer it warm.

7. When you are ready to serve the soup (warm or cold), puree in blender until smooth:
          3 TB olive oil
          1/2 cup packed fresh cilantro leaves
          1 TB fresh lime juice
          salt to taste (I like mine rather salty)

8. Ladle the soup in small bowls. Drizzle some cilantro puree over each bowl and serve.

The soup can be refrigerated for several days.

Saturday, August 22, 2009

correction

I realized that I forgot to include the chopped scallions in the Black Bean Quinoa Salad recipe. So I updated the recipe to include that.

Also, I was recently reminded (by Cook's Illustrated) that most herbs are oil-soluble, meaning their full flavor isn't released until mixed in oil. So there might be reason after all to use a bit of oil in the salad. Next time, I'll try mixing the cilantro in a couple tablespoons of oil before mixing it into the salad. I'm curious to see if it makes a difference.

Friday, August 21, 2009

roast beef sandwich at Globus


On Thursday, I saw that the Bahnhofstrasse Globus has a guy outside with huge smokers and stacks and stacks of wood, making roast beef sandwiches. This was a combination I just couldn't ignore. Happily, I wasn't disappointed. It wasn't the best sandwich I've ever had, but it was definitely good grub and a nice change from the standard Zurich street food. I don't know how long he's been there or how long he'll stay. So check it out asap. He's got bbq sauce, but I think the chimichurri sauce is the way to go.

Thursday, August 20, 2009

I heart quinoa


I've been trying to use a variety of grains in our diet and quinoa is certainly my favorite. Quinoa is a magical food with very high protein and a balanced set of amino acids, making it a complete protein, unlike wheat or rice. Plus it's tasty! Most health food stores in Zurich carry it. I've been using red quinoa from Vital Punkt (Stockerstrasse 38, Zurich) at 8.50sfr for 500g (about 3 cups) - ouch! But I heard Aldi is carrying regular quinoa right now for much cheaper. I need to stock up. Here's my new favorite recipe using quinoa.

Black Bean Quinoa Salad
Adapted from Epicurious

Among other things, the original recipe calls for oil in the dressing, but I found the salad very tasty without it. The original recipe also uses a two-step cooking process for the quinoa, first boil, then steam. I tried it and while this method produces drier quinoa, it was basically the same and I prefer simply boiling and draining the quinoa.

1. Prepare quinoa: In a small bowl or sieve, wash 1 cup quinoa in cold water until water runs clear then drain.

2. In a medium sauce pan, bring 2 cups water to a boil. Add rinsed quinoa and 1/2 tsp salt. Reduce heat to med-low and simmer for about 15 minutes, until tender. Drain quinoa in sieve.

3. In a large bowl, combine:

cooked quinoa from above
~2 cups cooked black beans, rinsed if canned (two 15oz cans)
1 large red pepper, chopped
1-2 jalapeño or serrano chilies, minced (not optional!)
2 scallions, chopped
1/4 cup finely chopped fresh coriander (not optional!)
5 TB fresh lime juice (about 2 limes)
splash of balsamic vinegar (optional)
1 tsp salt
4. Adjust seasoning. Chill until serving. I prefer it cold, but also at room temperature.

Quinoa with Dried Fruit & Nuts
Some of my friends tried this dish the other day, so I'm including this recipe although I don't have a picture. I serve this along with a baked sweet potatoes and sauted greens, like spinach or chard.

1. Prepare 1 cup cooked quinoa (see above for instructions).

2. Stir in:
1 cup dried apricots, chopped
1/2 cup dried cranberries, chopped
1 cup toasted pecans, chopped
Eat and enjoy!

Saturday, June 20, 2009

fried zucchini flowers


Inspired by my last laughing lemon class, I finally made fried zucchini flowers at home. I was scared to do this before because I knew they were expensive and I didn't want to mess it up. I shouldn't have worried. It was easy.


I had been looking for zucchini flowers for a couple weeks at the farmers' market and finally saw them at Bürkliplatz, at a vendor on Fraumunsterstr nearest to the lake. They were 1.20sfr a piece, not cheap but not too expensive for a special treat. So let's get started (full recipe at the end). You start by mixing up a simple batter and letting it chill while you prep the flowers.


Fried Zucchini Flowers
adapted from Laughing Lemon

I made a few adjustments to the recipe because I didn't have some of the special ingredients on hand. The original recipe includes 20gr chickpea flour in the batter and uses sparkling water instead of tap water.

1 egg
150gr flour
salt & pepper
220ml iced water
2-3 liters peanut oil for frying
up to 10 zuchinni flowers (plan on 2/person)

To make batter: whisk egg until well blended, then whisk in flower and season with salt and pepper. Slowly add water and whisk until smooth. The batter should be somewhat runny. Put in fridge until ready to use (up to 1 day).

Prep your flowers: remove the spines at the base of the outside of the flower. Carefully remove the stamen from inside the flower. Cut off the woody end of the zucchini. You can also remove the zucchini and just fry the flower.

Heat your oil to 360F/180F in a deep, wide pan large enough to accommodate the full length of the zucchini and flower. One at a time, dip the flower and zucchini in the batter and let excess batter drain off over bowl. Carefully drop the flower into the oil. Repeat, only adding a couple flowers at a time so the pot isn't overcrowded and the oil temp doesn't drop. Fry about 3 mins until golden. Remove and hold over pot, flower down to let oil inside the flower drain out. Then place flower on paper towels to drain. Sprinkle with salt. Serve them warm. They are not very good cold, so plan your menu accordingly.

Note: Since you already have hot oil, you might as well fry up anything else you have on hand. We cut up carrots and fried them up in the batter - tempura heaven! I wish I had some dough ready for doughnuts or fry bread. I considered frying up cheese and jalapeños but I restrained myself. This is not America.

You can also stuff the flower with a ricotta/parmesan/egg/herbs/breadcrumbs mixture before frying. I'm going to definitely try that next time.

Sunday, June 07, 2009

what's in season: june

I took another Laughing Lemon class last week (with 3 friends, yay!) and got even more excited about the summer produce than I already was. Here are some highlights. I forgot to take pics of the other yummy stuff like a watermelon drink, gazpacho, and zucchini stuffed phyllo pie, but this should give you an idea of the fun we had. Thanks Jack & Sylvia!


We made flavored vinegar with herbs, garlic, and chili. I have to wait two months before enjoying it, but it's pretty while I wait.


Tomato tasting - apparently June not great for tomatoes because Italian tomatoes are already done (best in March & April) and Swiss tomatoes aren't ready till July. But we still tasted several varieties, including my favorite Piccadilli (the tiny oval ones).


ratatouille waiting to happen - we ate it an hour later


cucumber tasting


Samphire, which goes under a variety of german names - meerbohnen, seespargel, etc. It's a crazy little plant that tastes like salt water. It's often served with fish. It was fun to see and taste some completely I've never heard of before.


Beautiful zucchini flowers, which always remind me of my first trip to Italy with my husband before our kids were born. I ate zucchini flowers for the first time at a fantastic little restaurant in Florence. We liked the place so much, we ate there two nights in a row.


zuchinni flowers, battered and deep-fried - I could eat these all night long


baked polenta with rosemary butter, I think


salad with delicious farm-fresh greens and lots off veggies like beets, kohlrabi, purple carrots, baby tomatoes


then we sit down and eat, starting with the salad


then ratatouille and polenta


then this sassy dessert - cherry clafouti


the dessert plate with cherry clafouti, roasted apricots, vanilla ice cream

Sunday, May 17, 2009

market report


five peas in a pod - a sight for sore eyes

Jack from laughinglemon.ch generously gave me and Jenna a tour of the Oerlikon farmer's market. He showed us all his favorite vendors, showed us a few to avoid, pointed out special produce, and encouraged us to try a few new things. We had wonderful time and I feel much more empowered at the market now. Thanks Jack! Here are few of the pretty and delicious things I brought home.


I've seen sugar snap peas a couple times at the market, but they were always starchy and nasty. This time, they were perfect, bringing a little tear to my eye. It's strange how the absence of such little things in my life can create such an emotional reaction when they reappear. Only two more weeks for these sweeties.


Crinkly spinach or "spinat grob" from Italy is my new favorite green. I've been getting it every week and sautéing it with garlic and pepper flakes, then serving it with a baked sweet potato and quinoa with dried apricots, dried cranberries, and pecans. It's our favorite regular meal right now, even if it's a bit wintery.


I couldn't resisted this beautiful purple arugula from Italy. It seems nutty, a bit less bitter than the regular stuff. I ate it as a green salad, with scrambled eggs, and with roasted new potatoes and a mustard vinaigrette. I loved it.


And asparagus, of course. I am lazy and make the simplest dishes possible with my produce. For example, I made this meal three weeks in a row for lunch after my shopping trip: sauted asparagus and piccolo tomatoes with pecorino vecchio on whole wheat bread. I like being able to taste the individual ingredients, instead of always being masked by the preparation.

Monday, May 04, 2009

crispy and delicious: fried chicken


fry it up!

My friend wanted to make fried chicken for a party and I suggested a recipe from Cook's Illustrated (because I usually have good luck with their recipes), though I had never tried this one myself. I and all the party-goers thought the chicken was fantastic, but my friend was slightly annoyed by the fussiness of the recipe. So I tried the recipe myself, to endure the fussiness that I unwittingly inflicted on my trusting friend. Besides the strict brining/refrigerating schedule that dominates your whole day, the recipe didn't seem too fussy to me, no doubt because I've built up a fussiness tolerance through years of cooking with Cook's recipes.

Mine was good but not quite as wonderfully crispy as my friend's - I have the will but not the magic when it comes to cooking. But it was still very good, especially cold the next day on a picnic. My friends thought I was a little weird eating cold fried chicken, but where I come from, cold fried chicken is standard picnic fare. I'm definitely making this again soon.


the fussiness begins with three heads worth of garlic cloves that are smashed with the spices - at least I didn't have to peel them


here's the smashed mess


then you combine the garlic mess with 7 cups of buttermilk for the brine - it made me cringe to throw out 3.50sfr worth of buttermilk after the 2 hour brine, but I was afraid to skimp, throwing off the salt to liquid ratio

 
here's my dredging station: chicken, fresh buttermilk (not from the brine) +  egg, and flour

 
dredging is a messy business - fortunately, you can dredge everything and have it sit awhile before throwing it in the oil

 
I'm not afraid of eating fried food, but I'm still a little afraid of frying it - I made my husband drop the chicken pieces in


yummy juicy chicken sealed inside the crispy exterior


can't eat fried chicken without slaw and potatoes - even KFC knows that

Crispy Fried Chicken
Recipe from Cook's Illustrated

1. Cut up one whole chicken (about 3.5 pounds or 1.5 kilos) into 12 pieces.

2. In large zipper-lock plastic bag, combine:
    1.25 cups kosher salt or 1/2 cup plus 2 tablespoons table salt
    1/4 cup granulated sugar
    2 tablespoons paprika
    3 medium heads garlic , cloves separated
    3 bay leaves , crumbled

3. With flat meat pounder, smash garlic into salt and spice mixture thoroughly. Pour mixture into large plastic container. Add 7 cups buttermilk and stir until salt is completely dissolved. Immerse chicken and refrigerate until fully seasoned, 2 to 3 hours.

4. Remove chicken from buttermilk brine and shake off excess; place in single layer on large wire rack set over rimmed baking sheet. Refrigerate uncovered for 2 hours. (After 2 hours, chicken can be covered with plastic wrap and refrigerated up to 6 hours longer.) (Note: I've seen other recipes that brine overnight, so perhaps you can be more flexible with the brining schedule.)

5. In a large shallow dish, measure in 4 cups all-purpose flour (I used only 2 cups, which was more than enough).

6. In a medium bowl, combine
    1 egg, slightly beaten
    1 teaspoon baking powder
    1/2 teaspoon baking soda
    1 cup buttermilk

7. One by one, drop chicken pieces in flour and shake pan to coat. Shake excess flour from each piece, then, using tongs, dip chicken pieces into egg mixture, turning to coat well and allowing excess to drip off. Coat chicken pieces with flour again, shake off excess, and return to wire rack.

8. To keep chicken warm after frying: Adjust oven rack to middle position, set second wire rack over second rimmed baking sheet, and place on oven rack; heat oven to 200 degrees.

9. Line large plate with double layer paper towels. Meanwhile, heat oil (oil should have 2 1/2-inch depth in pan) to 375 degrees over medium-high heat in large 8-quart cast-iron Dutch oven with a diameter of about 12 inches. Place half of chicken pieces skin-side down in oil, cover, reduce heat to medium, and fry until deep golden brown, 6 to 8 minutes; after about 3 minutes, lift chicken pieces with tongs to check for even browning; rearrange if some pieces are browning faster than others. (Spot-check oil temperature; after first 6 minutes of frying, oil should be about 325 degrees. Adjust burner if necessary.) Turn chicken pieces over and continue to fry, uncovered, until chicken pieces are deep golden brown on second side, 6 to 8 minutes longer.

(Note: I fried 6 mins on each side and this was definitely too long, the outside was too dark. I recommend checking the internal temp of the chicken and pulling it out early if it's at 180F/82C.)

Using tongs, transfer chicken to paper towel–lined plate; let stand 2 minutes to drain, then transfer to rack in warm oven. Replace paper towel–lining on plate. Return oil to 375 degrees and fry remaining pieces, transferring pieces to paper towel–lined plate to drain, then transferring to wire rack with other chicken pieces. Cool chicken pieces on wire rack about 5 minutes and serve.

Saturday, May 02, 2009

thin, crispy pizza


thin to win

We have a new favorite pizza dough at our house. We like thin, crispy pizza but this is been difficult to achieve in a home oven. I tried this strange recipe from The Bread Bible and loved the results so much that we've stuck with this same dough for months. Here's a little photo story:

You start by barely mixing the dough, just till it moistens the flour and gets scrappy - no kneading!


Then pour oil in a cup, roll the dough in it, cover and rise.


Then plop your science experiment brain on the counter.


Then use your fingertips to lightly push it into a circle, very thin.


After baking, this crust is so crispy that it stands up on its own. No drooping, no folding the slice in half to eat it.


Just look at that golden underside.


Recipe: Thin and Crispy Pizza Crust

Adapted from The Bread Bible by Rose Levy Beranbaum

In medium bowl, combine:
4 ounces AP flour
1/2 tsp instant yeast
1/2 tsp sugar
1/2 tsp salt

Pour in:
1/3 cup water, room temperature

Gradually stir in the flour into the water until all the flour is moistened and a dough just begins to form, about 20 seconds. It will be rough looking, not silky smooth. Do not overmix!

In a small bowl, pour
4 tsp olive oil

Add the dough and turn it over to coat with oil on all sides. Cover and rise at room temperature for about an hour or until double in size. (For better flavor, let dough sit 30 mins at room temperature then put in fridge for 6-24 hours. Remove dough from fridge 1 hour before shaping).

Preheat oven to 475F (220C) with pizza stone. Put dough on parchment paper or baking pan. Press the dough into a smooth round then let rest 15 mins. Press dough further into 10-inch circle. Cover with plastic wrap and let sit for 30-45 mins until it becomes slightly puffy.

Bake pizza dough (without toppings) for 5 mins.

Remove pizza from oven. Add toppings. Bake for another 5 mins or until cheese is melted and crust is golden.

Time: Mix 5 min, rise 1 hour, shape & rest 15 mins, rise 30-45 mins, bake 10 mins = 2+ hours

One caveat: my friend tried it and didn't like it. But she cooked hers on a silpat on a pan, not on a pizza stone. So I suspect her result was quite different from mine.

Thursday, April 09, 2009

pasta by hand


humble beginnings of my pasta

I took another class from Laughing Lemon, this time "Pasta by Hand". I really enjoyed this class, especially the eating part. We made three different pasta doughs, shaped them into different shapes and ate them with different sauces. My favorite was the tortolini filled with ricotta, bärlauch, and rucola. The dough had a bit of buckwheat and whole wheat flour which made it pretty and so tasty.

The most important thing I learned was that pasta dough has to be kneaded just like bread dough to the windowpane stage. The recipes I've used before never instructed to knead this long. This made a huge difference on the texture, during both shaping and chewing. It seems obvious now - I wonder why I never knew this.

I can't wait to take the other courses, Pasta Art and Pasta Sauces.


So here's the class, all vigorously kneading our dough

 
mise en place ... initially scrappy dough


7:23mins kneading for each dough


first dough rolled out into logs then cut into bits

 
then shaped into orecchiette ("ears") - I need more practice


Jack made a brocoli rabe sauce for the orecchiette


extra delicious with crème fraîche

 
Next, pasta alla chitarra, aka guitar. This cool gadget has a 10m piano string strung across to cut the pasta.


you place the rolled dough on the chitarra and gently but swiftly roll over the wire

 
eventually the pasta is cut into perfect strips

 
aren't they lovely?


Jack whipped up a asparagus and broiled artichoke sauce


and we eat!


Next, filled pasta with the buckwheat dough

 
each gets some ricotta, bärlauch, rucola filling, then folded into half moon, then squish the ends together to get torteloni (a little too big for tortelini)

 
Jack finishes up the slow-roasted tomato and green onion sauce (my favorite!)


and we stuff more pasta into our full bellies


And of course, some dessert: brutti ma buoni "ugly but good," a very accurate desciption. Jack's recipe is a guarded secret so you'll have take the class to taste them.

Wednesday, March 25, 2009

gaufre de liege


Every street fair I've been to in Switzerland and beyond serves up Gaufre de Liege, the dense, chewy, yeasty Belgium waffles (not the light and crispy ones), served with a sprinkling of powdered sugar and sometimes a side of ice cream. I can't resist them and am never satisfied with just one (especially when I have to share with my two boys).

So I hunted down some recipes and settled the one that appeared most frequently, although it seemed absolutely ridiculous - 2 packages of yeast for only 1 3/4 cup flour??? I saw version of this recipe with same yeast with only 1 cup??? Plus, the dough is supposed to be more substantial than batter, like a brioche dough that you can form into loose balls. The proportions of liquid to flour did not add up. I followed the recipe as is and the resulting batter was much too loose to form into anything but a puddle and it was so yeasty, it tasted like beer. I was very worried. All signs pointed to no.

But amazingly, they were practically perfect in every way. Dense and light at the same time and only a hint of yeastiness just like the commercial versions. The secret is the pearl sugar (Hagelzucker in Switzerland) mixed into the batter at the last minute - it caramelizes against the waffle iron, creating its own sticky syrup.

Thanks Megan for letting me use your waffle iron!

The recipe below was originally published in The Boston Globe.

Sponge:
2 packages active dry yeast
1 1/3 cups warm milk
1 tablespoon granulated sugar
1 3/4 cups flour
1 egg, beaten

1. In a small bowl, sprinkle the yeast over the milk. Add 1 tablespoon of flour and the sugar; set aside for 5 minutes or until foamy.

2. Sift the remaining flour into a large mixing bowl. Make a well in the center and add the yeast mixture and egg. With a wooden spoon, stir well to make a smooth batter.

3. Cover and set aside in a warm place for 2 hours to rise until the batter has doubled or tripled in bulk.

Batter:
9 tablespoons unsalted butter, at room temperature
1/4 cup flour
1 teaspoon vanilla extract
1/4 teaspoon baking powder
Pinch of salt
2 tablespoons granulated sugar
3/4 cup pearl sugar

1. In a bowl with a wooden spoon, work the butter, flour, vanilla, baking powder, salt, granulated sugar, and pearl sugar into a paste.

2. Work the butter mixture into the sponge mixture until well combined. Cover, and set aside for 10 minutes.

3. With floured hands, shape the dough into 10 balls. Flatten one slightly and dust it with flour. (If the dough seems too wet to handle, that's OK. Pour the batter directly onto the waffle iron.)

4. Heat a waffle iron until medium hot. Place a flattened ball in the middle of the iron; close the top. Cook for 3 to 4 minutes. If the waffle iron is too hot, the sugar will burn. Some electric waffle irons bake on such a high temperature, it may be necessary to unplug the waffle iron intermittently to cool it off. Continue baking until all the waffles are done.

My note: despite its perfectness, I would be curious to see what happens with only one packet of yeast and a bit more flour.

Saturday, March 14, 2009

pancakes piled up till they reach the sky


Here's a new favorite. My husband found this recipe on Epicurious a few months ago and we've eaten them almost once a week ever since. My whole family adores them. My favorite thing is that you make the batter the night before, so there's no time wasted in a busy morning. It makes a lot but don't worry; they are great as snacks, lightly toasted up to two days later. Due to their extreme popularity in our family, we've renamed the "Oatmeal-Buttermilk Pancakes" to...

T's famous disappearing oatmeal pancakes
adapted from Bon Appetit

Makes about 16.

1. In a medium bowl, combine:
       2 cups old-fashioned oats or quick-cooking oats
       1/2 cup all purpose flour
       3 tablespoons sugar
       1 teaspoon baking soda
       1 teaspoon baking powder
       1/2 teaspoon salt

2. In another medium bowl, whisk together:
       2 1/2 cups buttermilk
       2 large eggs
       1/4 cup (1/2 stick) unsalted butter, melted
       1 teaspoon vanilla extract

3. Add liquid ingredients to dry ingredients; whisk until blended but some small lumps still remain. Let batter stand to thicken, about 2 hours or cover and refrigerate overnight.

4. Preheat oven to 250°F to hold pancakes (they hold beautifully!).

5. Heat heavy large skillet over medium heat. Brush skillet with melted butter. Working in batches, ladle batter by 1/4 cupfuls into skillet. Cook pancakes until bottoms are golden brown and bubbles form on top, about 2 minutes. Turn pancakes over; cook until bottoms are golden brown, about 2 minutes. Transfer to baking sheet. Keep warm in oven. Repeat with remaining batter, brushing skillet with more butter as necessary.

Serve with lingonberry preserves for a traditional Swedish flavor.

Tuesday, March 10, 2009

crazy carrot


I thought you all might enjoy this crazy carrot I saw at the Bürliplatz farmer's market today.

Posted by Picasa

Sunday, February 15, 2009

poffertjes


what is hiding under that blanket of sugar?

A gold star for you if you knew what this post would be about just by reading the title. Poffertjes are tiny Dutch pancakes, similar to Danish Ebelskivers, but not filled. They are just covered with butter and a ridiculous amount of powdered sugar, as demonstrated in the picture above. I consumed these almost three years ago in Den Haag (The Hague), but it was such a fond food memory, I had to post it. This is a treat not to be missed.


the cook at the enormous specialized grill, with hundreds of little pockets ready for the batter


deftly flipping the pancakes with a special fork-like tool


the gigantic blob of butter sliding off the pile of Poffertjes


lubed up and ready for eating

Friday, February 13, 2009

züri-schnürre mmh...


After this convincing argument by my significant other:

"It's not particularly good, but it's not that bad either. And you can only get it in Zürich, so you should try it."
...I decided to sample the Züri-Schnürre. It's like a hot veal spam sandwich. I don't know if it was "Mmmh..." (as advertised in the sign below) but it was tasty in a "I'm really hungry and I don't want a doner" kinda way. If you live in Zürich, you should definitely try it and maybe buy the accompanying T-Shirt. Pepito Snack is at Niederdorfstrasse 10, Zürich. Apparently, "pepito" their signature sweet mayo-like sauce that is applied to a variety of sandwiches. The sauce is tasty but they use a heavy hand so I'd recommend asking for less.  

Saturday, January 31, 2009

charcoal


This is what happens when you accidently leave pumpkin roasting in a 400F oven for 5 hours while you're out visiting friends.

Posted by Picasa

Wednesday, January 28, 2009

gyros at home?


greek lamb-burgers anyone?

If I loved Döner kebabs, I guess I'd be quite happy with the Zürich food scene since there seems to be a Döner stand on every corner. But I don't love them (although the ones at that place on Hohlstrasse near the Altstetten train station are pretty good - do you know about this place too? Seems like everyone does), I love gyros and the only one I found in Zürich was not very good and expensive, my favorite combo. So I tried a home-version recipe from Cook's Illustrated with fairly good results. Basically, you make little greek-flavored lamb-burgers and wrap them up in a pita with tzatziki sauce. It was definitely a tasty dinner, but it didn't quite satisfy my gyros craving. I guess I'll have to try this recipe that involves the more traditional rotisserie method.


another tasty way for my beloved griddle to earn its keep

The real fun was the pitas. I like my pitas soft and puffy and these did not disappoint. I used the Bread Bible recipe this time (below). It was easy except it instructed me to roll out all eight circles and let them rest for 10 mins before cooking them. Um, where am I supposed to put all those rolled out circles??? I improvised counter space with a couple baking pans set on drawers.


Also, I can only fit 2 at a time in the oven, so the other circles are "resting/rising" 5-15 mins longer than the others. This might have been the reason the later pitas didn't puff like the first ones. Not sure. But the ones that puffed, puffed sky-high.


look how tall!


I love the internal structure of my puffed up pitas


this definitely was not a one-pot meal


a little peek at the tornado I left in my wake


was this little sandwich worth all that trouble?


The Tzatziki sauce was the best part. I always want more sauce when I get take out. So at home, I got to eat as much as wanted. I'm happy that Coop now carries this inexpensive greek yogurt. It's just as delicious as that Total brand at 1/4 the price.

Gyros
Adapted from Cook's Illustrated

Tzatziki Sauce

1 cup plain whole-milk yogurt (greek yogurt works best)
1/2 medium cucumber , peeled, seeded, and diced fine (about 1/2 cup)
3/8 teaspoon table salt
1 tablespoon fresh lemon juice
1 small garlic clove , minced or pressed through a garlic press (about 1/2 teaspoon)
1 tablespoon finely chopped fresh mint leaves or dill

Drain the yogurt in a fine-mesh strainer lined with paper towels for at least 30 minutes. Meanwhile, combine cucumber, 1/8 teaspoon salt, and lemon juice in colander set over bowl and let stand 30 minutes. Discard drained liquid from yogurt. Combine thickened yogurt, drained cucumber, remaining 1/4 teaspoon salt, garlic, and mint in clean bowl.

Lamb Patties

4 pita breads
3/4 cup bread crumbs (use the tops cut off the pita bread or part of one pita bread)
1/2 medium onion, chopped coarse (about 3/4 cup)
4 teaspoons fresh lemon juice
1/2 teaspoon table salt
1/4 teaspoon ground black pepper
1 tablespoon minced fresh oregano leaves
2 medium garlic cloves, minced (about 2 teaspoons)
1 pound ground lamb
2 teaspoons vegetable oil

1. Process onion, lemon juice, salt, pepper, oregano, garlic, and bread/pita pieces in food processor until smooth paste forms, about 30 seconds. Transfer onion mixture to large bowl; add lamb and gently mix with hands until thoroughly combined. Divide mixture into 12 equal pieces and roll into balls. Gently flatten balls into round disks, about 1/2 inch thick and 2 1/2 inches in diameter.

2. Stack the pitas, wrap tightly in foil, and place in 350F oven for 10 minutes to warm and soften them.

3. Heat oil in 12-inch nonstick skillet over medium-high heat until just smoking. Add patties and cook until well browned and crust forms, 3 to 4 minutes. Flip patties, reduce heat to medium, and cook until well browned and crust forms on second side, about 5 minutes longer. Transfer patties to paper towel-lined plate.

4. Spread 1/4 cup Tzatziki Sauce inside each pita. Divide patties evenly among pitas; top each sandwich with tomato slices, shredded lettuce, and feta. Serve immediately.

Pita Bread

Adapted from The Bread Bible

16 ounces AP flour
2 tsp salt
2 tsp instant yeast
2 TB olive oil
1.25 cup water, room temperature

Mix all the ingredients together and knead the dough 10 minutes in a stand mixer (longer by hand) until the dough is very soft, smooth and sticky to the touch. It should pass the windowpane test. Rise in oiled bowl until doubled, about 1.5 hours. Preheat oven to 475F one hour before baking. Have oven shelf on lowest level and place baking stone or baking sheet on it before preheating. After the dough has risen, cut the dough into 8 or 12 pieces and shape each piece into a ball and flatten into disks. Cover the dough and let it rest for 20 minutes. Roll each disk into a circle a little under 1/4 inch thick. Let them rest 10 minutes before baking. Quickly place dough circles (as many as will fit comfortably in the oven) directly on the baking stone or sheet and bake for 3 minutes. It should puff but not beginning to brown. Remove the pitas and wrap in a clean towel (or tortilla warmer) to keep them soft and warm. Eat immediately.

Friday, January 23, 2009

constant temperature


I've got another gadget for you: the Cuisipro thermometer whisk. As you may have noticed, I love measuring things. When making custards, you have to constantly whisk it and monitor the temperature so it doesn't go above 180F and curdle the eggs. This cutie combines the two functions, with a thermometer built into the whisk. Mysteriously, every internet site I checked was out of stock. I searched for it on the internet for over a year and finally found one for sale last November on eBay. I snatched it up right quick and promptly made some pies.

right on time


Another "absolute necessary" kitchen tool: my new timer, the Polder 898-90 Clock Timer Stopwatch (rec'd by Cook's). I hate my old timer (also rec'd by Cook's) because the stupid start/stop button is so loose that I have to hit it a few times before it takes and the thermometer feature is poorly calibrated. Why I love my new timer:

  • I can type in the time with the numbers, instead of repeatedly pushing an "up" button (really annoying when I need 50 mins).

  • I can type in exact seconds, if I want to be especially precise.

  • It has a "count up" feature, like a stopwatch, so I can time how long something is happening (like when I want to leave something in the oven a few more minutes and keep checking it - I can just start the stopwatch to track the time instead of constantly resetting the timer to 1 min.

  • It's super small so it fits in my pocket.

  • It has a string, so I can hang it around my neck.

One complaint: the beep is extremely loud (and not adjustable), but it does happily entertain my toddler so I'll look on the bright side.

Monday, January 19, 2009

homemade granola


crunchy bowl of healthy goodness

I happened to be at my friend Jenna's house while she was making homemade granola for Christmas gifts. It never occurred to me to make my own granola, especially living in the land that invented birchermüesli and sells a dizzying variety of granolas. But wow, it was delicious; I couldn't stop eating it. She's more of an intuitive cook and doesn't strictly follow a recipe. But I jotted her notes down anyway and tried it at home. After three tries, I finally got it right.


my favorite way to eat it - with plain yogurt

Two reasons to make it yourself. One - you know exactly what is in it. I was surprised that every granola/müesli I looked at in the store (even bio/organic brands) had lots of preservatives and other numbered ingredients. Two - you can adjust the ingredients to match your preferences. I love nuts and am always disappointed how few show up in the store-bought variety. So I use lots in my homemade mix.  If you like it sweeter, add more sugar. If you hate coconut, don't use it. If you like dried fruit, mix it in immediately after baking. You are the boss. 

Homemade Granola

Preheat oven to 325F(160C).

In a large bowl, combine:
    4 cups oatmeal (whole rolled oats, not instant)
    3 cups chopped nuts (I prefer a mix of cashews and pecans)
    1 cup seeds (I use a salad seed mix that has sunflower, pumpkin, flax, etc)
    1 cup shredded unsweetened coconut
    1/4 raw sugar

In a small bowl, combine:
    1/4 cup olive oil
    1/2 cup honey
    1.5 tsp vanilla extract

Add liquid mixture to dry and stir until everything is moistened. Press flat into a baking sheet (about 1/2 inch deep). Bake 20 mins, then stir granola well and then flatten back down. Back another 10-15 mins. Watch (and smell) carefully so it doesn't burn. Cool and store in fridge for weeks.


In Switzerland, it's not particularly cheaper to make your own, since we don't have Trader Joe's and Costco as inexpensive sources of nuts and other pricey ingredients. But it's not too bad; I estimated about 8-10sfr for about 1.1 kilo of granola. A 500g bag of basic granola at Migros costs 4.40sfr. 


raw mixture


flattened into baking sheet

 
one batch fills this 2.2 liter container

Wednesday, January 14, 2009

it's a circus


In addition to all the kitchen gadgets I ordered myself, my step-mom brought several more as Christmas gifts and I'm having great fun using them. She brought this cute animal crackers kit from Williams-Sonoma and my 4yr old has been very anxious to put it to good use. I was a little skeptical as kits like this often look very cute but don't work very well. But happily, I was wrong; it was fun and the cookies are yummy. 


The cutters work with a spring action. First you press the cutter into the dough, then you lift the cutter with the dough still inside and set the cutter down on your baking sheet. Then you press the lever down to make the impression, holding the cutter down on the sheet. Then press the lever and life the cutter to release the dough. It took some practice to make the impressions deep enough but not too deep, going all the way through. The method is a little fussy and my 4yr old got bored after one sheet. But overall, I liked the kit and definitely liked the results.


The recipe comes on the back of the box (and on their website) and the only change I would make is to reduce the cooking time from 14-16mins to 9-10mins. At 14mins, mine were positively burnt (I was frantically cooking dinner and wasn't watching them closely).  Also, I skip the whole 2hrs in the fridge thing. I just roll my out immediately after mixing and stick it outside in the below zero weather for 10mins and then start cutting. Little boys just can't wait all day for cookies.

absolutely "pourfect" commercial break


More gadgets... I saw these "Pourfect" bowls promoted on Rose Levy Beranbaum's blog and immediately put them on the top of my wish list. The bowls cleverly solve one big headache: pouring ingredients into my kitchen aid, particularly while it's running. With a regular bowl, the contents spread out across the bowl lip, forcing me to slosh the bowl side to side to keep the contents from spilling out the sides. In contrast, the Pourfect bowls are oblong with a pronounced channel and wings on the pouring side so the contents pour straight out and nothing falls out the side. I was a little put-off by the infomercial marketing style of their website, especially the videos. But I was pretty quickly convinced, and in true late night infomerical fashion, I bought the whole kit and caboodle: 6 bowls and 3 measuring beakers. And I'm not sorry. I love them and use them all the time. OK, enough of the promo and back to baking!

Saturday, January 10, 2009

pie bag

I just had a visitor from the US, so I have lots of fun new kitchen tools to play with. Perhaps my favorite is this pie crust pouch that I got from Fantes (my favorite kitchen supply site). I used to roll my dough between parchment to prevent the crust from sticking to my rolling pin or soaking up too much flour. But the parchment slides all over the counter. Not only does this pie bag help you roll in a properly sized circle (I got the 14in bag, which helps me roll to 12in, perfect for a 9in dish), but if you slightly wet the counter, it sticks in place and doesn't move unless you purposely tug at it. I love it! Best $4.49 I ever spent. See it in action...


my little dough ball, ready to get worked


rolled out to 12 inches


unzip and peel off the top, flip over and peel off the bottom


use the bag to help you flip the dough over onto the pie dish


it doubles as a pie storage bag - I just zip up the baked pie and place it into the fridge without all that fuss with plastic wrap

finally, some real chow!


This post is for city people and particularly anyone from San Francisco. And when I say San Francisco, I mean the city. You know who you are. I'm posting this for people that appreciate places like ShalimarCordon Bleu, Home Plate, and Swan Oyster Depot.  I suspect that other people just won't get what I'm trying to say. Maybe I'm wrong.

My husband recently took me to this great little Lebanese joint, der grüne Libanon, at Haferstrasse 7 (I think) behind the HB, a "bad part of town" which, of course, also means fun stores selling interesting and delicious things. We had the mixed grill plate for two, which came with flatbread and spreads (hummus, baba ganoush, etc). It was so yummy, totally satisfying and good value: "only" 25sfr, about $11/person.


Now someone who reads this post might eat there and say, that food wasn't so special, I can get better food here or there, bla, bla, bla. These people don't understand what I'm talking about. I'm not saying this is the best food I've ever ate in Zurich or that I'm a connoisseur of Lebanese food. I'm just saying that this was good, tasty chow at a good price, something quite rare in Zurich. This place clearly takes pride in their food. It made me happy and made me want to go back on a regular basis.


Back in SF, I easily ate out five nights a week, usually spending under $20 for 2 people, with drinks! Not only can I not afford to do that in Zurich, I wouldn't want to. It is just not right to pay 60 francs for a couple curries and some naan. Usually when I say something like this to a Swiss person, they look at me like I'm crazy. "No good food in Zurich? But haven't you been to bla, bla, bla."That's not what I'm saying. I'm talking about chow food, not a special night out. I'm almost convinced this is a cultural divide that cannot be bridged.


Clearly, we were two very satisified customers. Can't wait to go back.

Tuesday, December 30, 2008

cranberry sauce


There's only one recipe that I make exactly the same every Thanksgiving, the cranberry sauce. I wish I was motivated to cook more things with which I can eat it. I think I got this recipe from my first food friend, Michelle, who was one of the first to inspire me to cook more challenging and interesting things. People always ask for the recipe so here it is.

Cranberry Relish
Yield: About 2 cups

12 oz cranberries
1 cup sugar
1 orange, zest and juiced
1 large pear, chopped
1 large apple, chopped
½ tsp cinnamon
¼ tsp ground cloves
pinch of nutmeg

1. In medium saucepan, place cranberries and 2 cups water.
2. Bring to a boil, then lower heat and simmer for 5 minutes or until berries begin to pop.
3. Add orange zest and juice, pear, and apple, cinnamon, cloves, and nutmeg.
4. Simmer 15 minutes. Remove from heat and cool to room temperature.
5. Optional: drain extra liquid to desired consistency.

You can make a couple days ahead of time, stored in fridge until ready to use, or can it.

Saturday, December 27, 2008

raw milk does a body good


For the past year, a couple of my friends have been praising the benefits of raw milk. This blurb from www.realmilk.com explains it quite nicely:

Like most foods, the nutritional quality of milk suffers considerably during processing. Homogenized fat becomes inaccessible, and we need the fat in milk to absorb calcium. Pasteurizing milk kills bacteria essential for its digestion, converts lactose to an indigestible form, interferes with calcium absorption, and destroys vitamins A, C, and B complex. (Child Health Guide, Randall Neustaedter, OMD)
And according to raw milk advocates, raw milk is actually very safe despite the heavy marketing to the contrary. In the US, it's basically illegal, though various communities have found ways (like buying a share in a cow) to still get some. Want to know more? http://www.raw-milk-facts.com/

Anyway, I finally decided to try some, motivated by the benefit of using reusable glass bottles instead of recycling or throwing away seven bottles a week. The Kilchberg farm near my house has a self-serve raw milk dispenser, at 1.50sfr/liter. You just put in some coins, push start, and milk pours into the bottle. The first time I went, they were just bringing a new barrel of milk straight from the barn, so the milk was still warm and so sweet and delicious.It makes me happy to do it, feeling close to the earth and all that silly stuff. I especially love how the cream separates after a day. But since I have a grocery one block from my house where I can get delicious organic, albeit pasteurized, milk, I can't motivate myself to drive out to the farm very often. But every time I'm in the neighborhood, I make a point of stopping by to get a couple liters. Now if they would only deliver : )


just like water machines but somehow much more fun


the Kilchberg farm where we get the milk

Local farms with raw milk:
Kilchberg farm - Stockenstrasse 88, Kilchberg
Adliswil farm - Tüfistrasse 18, Adliswil

Friday, December 05, 2008

I'm thankful for pie


it's nice sometimes feeling as american as apple pie

This is a gratutious posting about pie. Nothing fancy, just traditional pie. I went to a Thanksgiving dinner hosted by my church and, of course, I brought pie. Here's my apple pie with my new favorite pie dough. The key to super yumminess is to macerate the apples in the recipe's sugar for 30+mins, drain off the liquid, boil it down to a syrup, then add back to the pie filling (thanks Ms. Beranbaum!).


And here's my pumpkin pie. Despite its extra luscious, nowhere-near-curdled, perfectly smooth texture, it still cracked (usually a sign of overbaking). No fear - I just baked up some dough scraps into little leaves and hid the unsightliness. The secret to this pie's yumminess is simmering the canned pumpkin with the spices before making the custard. It awakens the pumpkin flavor and gets rid of any canniness. I could use fresh, but both Cook's and Ms. Beranbaum embrace this shortcut, so I feel justified.


I was so pleased that the knife designs survived baking.


Finally pecan pie, um, I mean tart. I only have two pie pans so my tart pan had to pinch hit. But I was so pleased with the result that I do believe all future pecan pies will call this pan home. This is my husband's and my friend Julie's favorite pie so I have lots of excuses to make this pie over and over. Yay!


Per request, I'm posting the pecan pie recipe, for which I take no credit. I'm just good at following directions. You may be tempted to use whole pecan pieces, which are prettier. But don't do it - it makes it too hard to cut the pie and results in sloppy pieces. And don't skip the pecan toasting! It awakens the real nut flavor. Just throw them on a baking sheet in a 350F oven for 8-10mins. Check them frequently to make sure they don't burn. And don't use any nuts if they burn, even slightly - seriously, throw them out and start over - you know who you are : )

Perfect Pecan Pie
Adapted from Cook's Illustrated. For more detailed instructions and illustrations, including a pie crust recipe, see the Cook's website (account password required).

1 batch of your favorite pie dough, rolled out, placed in pie pan, and prebaked (usually 20 mins at 375F) - don't forget your pie weights!

6 tablespoons unsalted butter , cut into 1-inch pieces
1 cup packed dark brown sugar
1/2 teaspoon table salt
3 large eggs
3/4 cup light corn syrup
1 tablespoon vanilla extract
2 cups whole pecans (8 ounces), toasted and chopped into small pieces

Preheat oven to 275F. Place pie shell in oven if not still warm.

Melt butter in double boiler (heatproof bowl set over pan with water maintained at just below simmer). Remove butter bowl from heat; mix in sugar and salt with wooden spoon until butter is absorbed. Beat in eggs, then corn syrup and vanilla. Return bowl to double boiler and stir until mixture is shiny and warm to the touch, about 130 degrees. Remove from heat; stir in pecans.

Pour mixture into warm shell; bake until center feels set yet soft, like gelatin, when gently pressed, 50 to 60 minutes. If your pie crust is overbrowning, cut a ring out of aluminum foil and place over the crust edges to protect them. Transfer pie to rack; let cool completely, at least 4 hours. Serve pie at room temperature or warm, with lightly sweetened whipped cream or vanilla ice cream.

Serves 8.

***If you don't have access to corn syrup or brown sugar (that means you, Zürichers!), there's another version of this pie that uses maple syrup (pricey but at least available in Zürich) and no brown sugar. I can't vouch for it but it's worth a try.

Monday, December 01, 2008

truffle madness


handmade truffles are easy but take absolutely forever to make!

I took a little chocolate-making class and got the fool idea to make a bunch of handmade truffles for Christmas gifts. So I ordered 256 truffle shells for myself and three friends. It was fun and festive at first, but after about three hours of hard chocolatier labor, I lost all energy and couldn't even look at those stupid things. They taste great, but I'm not sure it's worth the effort.


The madness began the night before when I made four different fillings: milk chocolate ganache, dark chocolate ganache, and milk/dark/caramel ganache (my favorite), and pure caramel (or as my friend Megan called it, pure Christmas). We planned to roll the different types differently (some in chocolate, some in coconut, some in cocoa powder, etc.) so we could tell them apart. But after about 20 truffles, we got impatient and starting throwing handfuls of truffles in every and any bowl of toppings that were available. So truly, "you never know what you're gonna get," though most of us agreed that the ones rolled in coconut were the best, regardless of the filling.


Above, we are filling the truffle shells with ganache. Then, an hour or so later, after the ganache had chilled and set, we topped the shells with melted chocolate. Then another hour or so later, we rolled the shells in melted chocolate (below) and rolled them around on the special truffle rack (like a waffled cooling rack) to create the signature truffle texture.


This step took the longest by far and nearly drove us all to insanity. We started dipping the truffles one by one, letting the excess chocolate drip off and carefully rolled them around before transferring to the wax paper. Very quickly we started rolling five at a time and after an hour, my friend Julie threw twenty at a time into the chocolate and simply dumped the whole bowl onto the rack. Our kids had fun helping out, mostly by licking chocolate off any and all surfaces.


They turned out quite pretty despite our sloppy technique. I ate and gave away most of my truffles before I got around to taking a pic of them en mass, so luckily my friend Julie took the above pic of our finished product. We each took home 64 truffles and here's my stash after giving away the prettiest ones and eating the ugliest.


Of course, truffles taste even better when they come in a pretty package. I had saved a few Sprungli truffle boxes from previous indulgences, so I repurposed them for my own handiwork. I only wish I had time to print up a cute label. If I ever do this again, I'll make my own boxes to accompany the treats to add an extra personal touch.

Thursday, November 20, 2008

weigh it


isn't it important to know that a piece of paper weighs .15 ounce?

My new favorite gadget (I never tire of saying this) is my new scale, the KD-8000 from MyWeigh, which I bought here for $50. Thanks Kim for bringing it back from the US!

So, how do I love thee? Let me count the "weighs":

- Ounces are shown as a decimal, not a fraction. My old scale used fractions and only did increments of 1/8. So if I needed 1/3, I had to guess.

- It's super-sensitive to 1 gram. With my old scale, I had to periodically push down on it as I added small amounts of flour so it would register the small weight change.

- The auto-off is configurable. I can't tell you how many times my old scale turned off in the middle of me weighing something.

- The max weight is 17 pounds. My old scale's max was 5 pounds, which is ridiculous if my huge glass bowl already weighs 2 pounds.

- It has the option to show the weight in ounces, not pounds & ounces. This means if I need 19.5 ounces of flour, I don't have to mentally convert that to 1 pound 3.5 ounces. (Yes, I should just use grams but I haven't translated all my old American recipe books quite yet.)

- It even has the super fancy "baker's percentage" feature, which allows you to weigh the flour and then show all subsequent measurements as a percentage of the flour weight. I may never use this feature but I love that it's there.

pumpkin galette


this super flaky crust is my new best friend

I'm totally in love with this pumpkin galette. The pumpkin and caramelized onion filling was so tasty, but the real star is the amazingly flaky crust. It's so flaky, it's like a croissant. I'm excited to try this crust with my pies this Thanksgiving and see how it holds up to more liquidy fillings. I found the recipe on Smitten Kitchen, which has recipes for other galettes that I can't wait to try: wild mushroom and stilton galette and cabbage and mushroom galette.

I made a few substitutions. The original recipe calls for butternut squash, but I used Muscade de Provence, (Muskatkürbis) which is the most popular pumpkin here (note to americans: all winter squash are called "pumpkins" here instead of "squash," one linguistic change I wholeheartedly embrace). I learned in the LaughingLemon class I took a few weeks ago that fully brown Muscade are tastier than partially green ones. Last week at the Zurich Bürkliplatz market, all the Muscade were mostly green. But this weekend in London, I visited the amazing Borough Street Market and found a fantastic display full of only all-brown Muscat (shown below). It should have made me happy but I only got depressed because I don't live in London and can't visit that market every week.


Muscade de Provence in all its glory

Unless you're feeding an army, no one buys a whole Muscade - you get a monster slice like the one below. After cutting, the flavor starts to diminish. So avoid pre-cut slices, cook it asap, and don't scoop out the innards until you're ready to cook it.


To make the filling, you first dice up the pumpkin and roast it for 30 mins. Mine was almost mush after 30 mins. I thought perhaps I should cook it less so the pieces stayed distinct. Still not sure.


With my first galette, I piled the filling high in the middle and folded over lots of crust (shown below). The second time I spread the filling out, leaving only 1.5inches border and only folded over a small border. I prefered the second method.


This galette is so sweet and rich, it needs to be paired with something fresh and tangy, like this nüssli salad with raspberry vinaigrette.


Recipe: Pumpkin and Caramelized Onion Galette
Adapted from Smitten Kitchen - I'm not fussy about my pastry, but the original recipe is, asking you to freeze the flour and butter for an hour, etc. If you are anxious about pastry making, consult the original recipe.

For the pastry:
1 1/4 cups all-purpose flour
1/4 teaspoon salt
8 TB (4 ounces, ) unsalted butter, cut into pieces
1/4 cup (2 ounces) sour cream - I used saucenhalbrahm (like sour cream but not sour) by accident the first time and it was just as good as the second one with sour cream
2 tsp fresh lemon juice
1/4 cup ice water

For the filling:
1 small butternut squash (about one pound, 500 grams) - I used Muscat de Provence, with excellent results
2 TB olive oil
2 TB butter
1 large onion, halved and thinly sliced in half-moons
1 tsp salt
Pinch of sugar
1/4 tsp cayenne, or to taste
3/4 cup fontina cheese (about 2 1/2 ounces), grated or cut into small bits - I had a hard time locating fontina (I have bought it before here, but it's not omnipresent) so I used raclette, which is a sister cheese to fontina
1.5 tsp chopped fresh sage leaves - I used 1/2 tsp dried sage with good results

1. Make pastry: In a bowl, combine the flour and salt. Cut up the butter into 1/2in chunks and cut into flour using pastry blender or two knives, until mixture resembles coarse meal. In a small bowl, whisk together the sour cream, lemon juice and water and add this mixture to the flour mixture. With a fork, mix in liquid carefully until large lumps form. Do not overwork the dough. Place dough in plastic wrap and lightly and briefly knead with knuckles and until dough mostly sticks together, without lots of dry parts (like 30 seconds). Wrap tightly in the plastic and refrigerate for 1 hour.

2. Prepare squash: Preheat oven to 375F (190C). Peel squash, then halve and scoop out seeds. Cut into a 1/2-inch dice. Toss pieces with olive oil and a half-teaspoon of the salt and roast on foil lined sheet for 30 minutes or until pieces are tender, turning it midway if your oven bakes unevenly. Set aside to cool slightly.

3. Caramelize onions: While squash is roasting, melt butter in a heavy skillet and cook onion over low heat with the remaining half-teaspoon of salt and pinch of sugar, stirring occasionally, until soft and lightly golden brown, about 20 minutes. Stir in cayenne.

4. Raise the oven temperature to 400F (205C). Mix squash, caramelized onions, cheese and herbs together in a bowl.

5. Assemble galette: On a floured work surface, roll the dough out into a 12-inch round. Transfer to an ungreased baking sheet. Spread squash, onions, cheese and herb mixture over the dough, leaving a 1 1/2-inch border. Fold the border over the squash, onion and cheese mixture, pleating the edge to make it fit. The center will be open.

6. Bake until golden brown, 30 to 40 minutes. Remove from the oven, let stand for 5 minutes, then slide the galette onto a serving plate. Cut into wedges and serve hot, warm or at room temperature. Serves 6.

Tuesday, November 11, 2008

cran-walnut-banana: magical combo


When I see an unexpected food item in Zurich, I panic and buy it immediately without having a clue when or for what I'm going to use it. Fresh cranberries, along with canned pumpkin, usually make a short appearance here in the fancy groceries (like Jelmoli and Globus) around Thanksgiving. So I was surprised in October to see lots of fresh cranberries at the regular Coop grocery. I immediately grabbed a bag, worried that this was a fluke and I'd never see them again. I wasn't quite ready to make my traditional chutney for our T-day turkey, so I combed my cookbooks for a cranberry recipe. I chose this cranberry-walnut-banana quick bread from The Bread Bible by Rose Levy Beranbaum, which is definitely yum. I particularly love the contrast of textures and flavors. I knew for sure that it was yum when I husband ate a slice for breakfast without my prompting. He's not much into the baked goods and normally doesn't eat breakfast. So for him to break his routine, I know it's something special.


Rose recommends serving it with whipped cream cheese - I agree!


Recipe: Cranberry Walnut Banana Bread
Adapted from The Bread Bible by Rose Levy Beranbaum

1 cup walnuts (4oz, 114g)
2 cups minus 1 TB all-purpose flour (9.5oz, 272g)
1 tsp baking soda
1 tsp salt
8 TB unsalted butter, softened (4oz, 113 g)
1 cup sugar (7oz, 200g)
2 large eggs, slightly beaten
1 very ripe large banana
1.5 TB sour cream - I was out and used yogurt, which was fine
1 tsp vanilla
2 cups fresh cranberries, cut in half (7oz, 200g) - it seems annoying to cut them all in half, but according to Rose, it prevents them from bursting and helps them absorb sugar.

1. Preheat oven to 325F (162C) and grease one loaf pan.

2. Toast the nuts on a baking sheet, about 7 mins (in oven that is preheating). Rub off the skins (skins are bitter) and chop coarsely.

3. In medium bowl, whisk together flour, baking soda, and salt. Set aside. In mixer bowl, cream butter and sugar, about 3 minutes till fluffy. Add eggs, banana, sour cream, and vanilla and beat about 1 minute until thoroughly blended. Add flour mixture and mix until just moistened, about 20 seconds. Add cranberries and walnuts and stir about 20 seconds until well combined.

4. Scrape the batter into the prepared pan. Bake 55 to 60 minutes until the bread is golden and top springs back when lightly pressed in the middle. Tent with foil during last 30 minutes to prevent overbrowning (I forgot to do this and my bread was fine).

5. Cool bread in pan about 10 minutes then remove from pan and cool on rack. Bread keeps about 4 days at room temp. Serve plain or toasted with whipped cream cheese.

Wednesday, October 22, 2008

quarkini to the rescue


I wanted to eat 10, but at 1.10sfr a piece, I settled for two

I've complained before about the terrible donuts available in Zurich. But last week I stumbled across Quarkinis at the farmer's market and I'm in love. It's a fluffy raised donut ball, with a slight tang from the quark, rolled in sugar. One reason it's taken me so long to find them is that they are hidden behind the counter, so you have to lean over mounds of other yummy bread to see the little basket of delicious morsels. I saw them at both Helvetiaplatz and Burkliplatz markets and apparently, they are also sold in the stores. Maybe everyone in Zurich already knows about these, but if I help one donut-deprived soul find their way to Quarkinis, I will be happy.

Wednesday, October 15, 2008

vanilla extract: make your own


I was excited to find a good use for this cool bottle I've had sitting in my cupboard for 10 years

I finally got around to making my own vanilla extract. I had a huge bottle of vodka left over from making ice cream and pie crust, which only require a couple tablespoons each per batch. Since I'm a teetotaler, I have to do something with the stuff besides drown my sorrows. So let the experiment begin. Day 1 was easy: mix 1 cup vodka with two sliced open vanilla beans, seal, shake, store. Apparently, I have to wait about 2 months before it's ready, shaking it occasionally to assist the infusion. I'll report back with the results.

Meanwhile... I've been told that vanilla sugar (readily available here) actually adds more flavor than vanilla extract, because with extract, the alcohol evaporates, taking some of the flavor with it. I don't know if I believe this - my baked goods taste plenty vanilla-y for me. But in the interest of food science, I've also started a jar of vanilla sugar (stick a sliced open vanilla bean in a jar with sugar and let it sit for awhile, refresh with a new bean as necessary). If I have the energy, I'll do some taste tests.

As previously mentioned, vanilla beans are dirt cheap here: 2.40sfr for 3 beans.

Tuesday, October 14, 2008

pastrami and rye


hot pastrami on rye with mustard: a match made in heaven

A few weeks ago, my husband discovered pastrami at the SihlCity Coop (has it always been there?) and my first bite of hot pastrami on rye with mustard made my eyes roll back in delight. Katz's Deli, it is not. But while in exile, I'll take what I can get. The first rye bread (the traditional caraway seed version, not simply Roggenbrot), we got was stale and tasteless. So of course, I had to make some from scratch (from The Bread Bible) to celebrate having pastrami back in our lives. Now I just need to borrow a smoker so I can make my own pastrami.


here's what it looks like so you can find it at Coop, near the prosciutto


yes, it's ridiculously expensive - it's about $26/lb vs. about $8/lb in the US
this little pack has less than 100 grams, enough for one hearty sandwich


my rye bread, with a crackling crisp crust


and inside: chewy, moist goodness

Monday, October 13, 2008

laughing lemon cooking class


My friend Jenna and I with Sylvia and Jack of LaughingLemon -
Jack said we're the first ones to ever request to take a photo with instructors

Ever since I met Jack of LaughingLemon a couple years ago, I've been planning to attend one of their cooking classes. Two weeks ago, I finally made it to their What's In Season class and it was everything I wanted and more. You should all sign up for a class right now! He spent about the first hour discussing various in-season fruits and vegetables and introduced us to some interesting varieties available at the local produce markets. I learned about white sweet potatoes from Italy (for baking, not purees - so yum!), sweet pomegranates from Spain (instead of tart ones from Egypt), cavelo nero (my new favorite cooked greens), why my potatoes go bad so quickly, when various veggies are at their peak flavor, etc.

Then he cooked, dispensing all sorts of useful tidbits about how to prepare the various ingredients. Then we (the 8 students) sat down and ate a five course meal consisting of the food he just prepared, plus a few additional items. It was so delicious! And an incredible value at only 65sfr (the other classes change a little more at 90sfr, but still excellent value). I had a great time and can't wait to go to another class.


my favorite dish: pumpkin puree on ginger crust with drops of pomengranate syrup (sorry for the bad pic)


dessert: pumpkin cake with rose hip sauce, which I'd never heard of before but was so yummy - I want to serve it with everything (he sent us each home with jar of the sauce)


eight satisfied customers

Thursday, September 25, 2008

butter, cream, and caramel - oh my!


I could certainly improve on the presentation but it tasted good

I hosted book club last week and provided a little ice cream sundae bar. Here's the menu.


I made most everything from scratch but only one ice cream, Butter Pecan, because I don't have the fancy self-freezing ice cream maker that lets you keep making batch after batch. Some of my book club ladies have requested recipes, so I'm including some of them below. (You'll have to ask Jenna for her hot fudge recipe - thanks Jenna!)

Salted Butter Caramel Sauce
This was the crowd favorite. It tastes like melted toffee - yum yum. This I would eat this sauce on anything (popcorn comes to mind) or simply drink it. Adapted from The Perfect Scoop by David Lebovitz

6 TB (85g) unsalted butter
3/4 cup (150g) sugar
1 cup (250ml) heavy cream
1/2 tsp vanilla extract
1 1/4 tsp coarse salt, preferably fleur de sel, which has a more delicate texture than kosher salt

In a small saucepan, warm the cream over medium heat (you don't want to pour cold cream into the caramel or the mixture will clump into hard chunks that you'll have to melt down again - I learned the hard way).

Meanwhile, melt the butter over medium heat in a large, deep, heavy-duty saucepan. Stir in the sugar and cook, stirring frequently, until the sugar is a deep golden brown and starts to smoke. Watch carefully that the butter doesn't burn (I burned my first batch, better to warm it slowly at a lower heat than fast at a higher heat). Remove from heat and slowly pour the hot cream in a small, steady stream while constantly whisking to prevent clumping. If any lumps of caramel form, whisk the sauce gently over low heat until they're dissolved. Stir in the salt. Serve warm.

This sauce can be stored in the refrigerator for up to 2 weeks. Rewarm gently in microwave or by stirring in saucepan over very low heat.

Peach Melba Sauce
I simply served a raspberry and peach sauce side by side, which the guest could combine over the ice cream.

12 oz frozen raspberries, thawed
1/2 cup sugar
1 TB lemon juice

Place fruit and sugar in a small saucepan over medium-low heat and cook sugar dissolves and fruit soften. Remove from heat and stir in lemon juice. Serve warm.

3-4 peaches, peeled, chopped into 1/2-inch pieces
about 3 TB sugar
about 1 tsp lemon juice

Same instructions as above. Just taste the fruit mixture and add sugar to taste. Serve warm.

Gingerbread Caramel Sauce
This was supposed to be butterscotch sauce, but I accidently used regular sugar instead of brown sugar. So I added a couple tablespoons of molasses, resulting in a very dark, strong sauce, very similar to the gingerbread caramels I made last winter. Adapted from the Cook's Illustrated butterscotch sauce.

1 cup granulated sugar
2 TB molasses (or less if you want a less strong molasses flavor
1/4 cup corn syrup
3 TB unsalted butter
pinch salt
1/2 cup heavy cream, room temperature or warmer
1 1/2 tsp vanilla extract

Combine sugar, molasses, corn syrup, butter and salt in a medium saucepan over medium heat, stirring often until the sugar melts. Reduce heat to low and simmer without stirring until syrup reaches 280F on candy thermometer, about 10 minutes. Remove pan from heat and slowly stir in cream until sauce is smooth. Stir in vanilla. The sauce thickens as it cools. Serve warm. You can store in the fridge for several weeks.

Butter Pecan Ice Cream
Wow, I love this ice cream. It's so much more buttery than the commercial stuff. Recipe adapted from Cook's Illustrated.

2 cups whole milk
1 cup heavy cream
1/2 cup packed brown sugar
2 TB unsalted butter
1/4 cup granulated sugar
4 large egg yolks
1 tsp vanilla extract
3/4 cup pecans, chopped and toasted (place chopped nuts in pan over medium heat, shaking occasionally to turn nuts, until fragrant, about 5 mins)

Combine milk, cream, brown sugar, and butter in saucepan over medium heat. Bring mixture to 175F, stirring occasionally to dissolve sugar. Meanwhile, in a separate bowl, whisk granulated sugar and egg yolks until it turns pale yellow and thickens so it falls in ribbons, about 2 mins with an electric whisk. When milk mixture is ready, remove about 1/2 cup of the mixture and very slowly whisk into the egg mixture (you are slowly bringing the eggs to a higher temperature without cooking them). Repeat a couple times, then slowly whisk the egg mixture into the saucepan. Reduce heat to low and slowly bring the mixture to 180F (don't cook those eggs!), stirring constantly. The custard should be thick, but not curdled or boiled.

Remove from heat, stir in vanilla. Pour through a fine mesh strainer into a bowl over ice and stir to bring temperature down (I usually skip this step and simply put the mixture in the fridge for a few hours or overnight). Cover bowl and chill until mixture reaches 40F. Pour into ice cream machine and churn until frozen. At the end of churning, add the nuts and churn 30 seconds to incorporate. Transfer mixture to storage container and freeze until firm. Ice cream will keep up to 2 days but is best on day one.

Tuesday, September 23, 2008

Zurich is expensive, what else is new

In any given conversation, I'm likely to discuss at least one, if not all, of the following Zurich topics: the depressing weather, the road construction and resulting traffic, and the high prices (gas is $6.80/gallon here), particularly for food. I'd like to document some of these for my US readers who think prices are high there. You ain't seen nothing.

Below are some comparisons of US and Swiss food prices. I actually started weeping as I made this chart. I knew it was expensive here but when you see it in print, it's shocking. I used normal grocery store products (Safeway vs Migros), not fancy gourmet organic stuff. I also didn't take into account the additional savings available by shopping in bulk at Costco, etc.

Assume $1 = 1 swiss franc. When I moved here three years ago, it was $.78 = 1sfr. The franc is worth more but prices haven't dropped here. So although prices are relatively stable, everything seems even more expensive compared to the US. I've stated prices in normal US quantities, like gallons and pounds, not liters and kilos.

ProductUS priceZurich price% higher
Milk$5.80/galFr. 6.25/gal8%
Ground beef$3.50/lbFr. 7.87/lb124%
Beef Chuck Roast$2.49/lbFr. 14.37/lb422%
Beef Filet Mignon$16.99/lbFr. 38.00/lb124%
Beef Sirloin$6.19/lbFr. 32.40/lb423%
Pork Shoulder$2.49/lbFr. 13.00/lb422%
Lamb stew meat$5.99/lbFr. 22.00/lb267%
Whole chicken$1.69/lbFr. 4.41/lb160%
Boneless chicken breast$3.99/lbFr. 14.00/lb250%
Bacon$5.99/lbFr. 9.72/lb62%
Butter$3.99/lbFr. 6.75/lb70%
Ricotta$3.50/lbFr. 5.76/lb65%
Sweatshop eggs$.25/pieceFr. .40/piece60%
Free range eggs$.32/pieceFr. .80/piece150%

Some things are less expensive. Vanilla beans are dirt cheap, only 2.40sfr for 3 beans. In the US, I'd pay $11 for 2 beans. A small packet of saffron (.035oz) costs $16.59, while in Zurich, the same packet would cost about Fr. 5.20.

How do these high prices affect my shopping? When I first moved here, I was paralyzed by sticker shock and got really upset every time I shopped. But with a double-punch combo of simply ignoring the prices and slowly changed our eating habits, we survive. I didn't eat much meat in the US, but here, I've dramatically reduced our family's intake. In stews, chilis, spaghetti sauce, etc., I usually use about half the meat called for in a recipe (for stew, I use 1.5 pounds instead of 3) and still cringe at the price. I usually add more veggies and/or beans to compensate. I'm scared what might happen if I move back to the US. I might eat myself into oblivion just to take advantage of the low prices.

Monday, September 08, 2008

American food products at gas stations and other unexpected places

In addition to Jelmoli and Globus, there are a few unexpected places to find American and English food products:

- Gas stations often carry different products than the Migros/Coop cartel. On the Run - Esso gas station in Kusnacht, Seestrasse 139 had on my last visit: Betty Crocker cake mix, A1 Steak Sauce, Bulls Eye BBQ Sauce, Arm & Hammer baking soda, etc.

- Cindy's Diner in Wädenswil (south of Zurich, connected to the gas station on the freeway) has, among other things, American cake mix, frosting, and Mountain Dew.

- Orell Füssli English Bookshop (Bahnhofstrasse 70, Zurich) - They have a random assortment of American and English products, like cake mix and tea cookies, on the second floor in the center. They used to also have these products the basement, so check both places.

- Despite the title, the "Brown Sugar" store in Adliswil does not carry brown sugar, it's just a typical low-end Swiss sandwich place. Don't waste your time.

You can also check these online stores:
- American Food Avenue
- Taste of America (they have brown sugar)
- American Market
- Premiere Videothek London Shop
- XpatXchange list of other online shops

I also found this helpful list of where to get certain American items in Zurich.

Thursday, September 04, 2008

rant: I hate European kitchen machines


will Vorwerk Thermomix solve all my problems?

Yea, I said it - I hate European kitchen machines and here's why:

a) I couldn't bring my trusty KitchenAid stand mixer and Cuisinart food processor here because of the 220V issue.

b) I couldn't rebuy the Cuisinart food processor because they don't sell it Europe. The basic KitchenAid stand mixer sells for 700sfr (vs $150 in the US) - luckily I found one for 350sfr. I would have preferred the KitchenAid professional, but it isn't sold in Europe. In fact, most of the models/brands highly rated by Cook's Illustrated, my cooking bible, are unavailable in Europe. So when shopping, I simply have to guess by the box marketing material and...

c) I hate my Euro food processor and blender! I used to make everything in my Cuisinart food processor: pie dough, cookie crumbs, bread crumbs, chopped nuts, hummus. My machine here does a terrible job, always leaving big chunks whirling around aimlessly no matter how much manual scraping and stirring I do. My hummus and peanut butter are terribly grainy. With any thick mixture, like pesto or chile paste, it only combines the stuff near the blade, pushing most of the mixture up the sides. After 5 mins blending butternut squash soup last night, my blender motor started emitting a strange smell and made sad noises. Aaaaargh!

But the clouds have parted and I have seen the light: the Vorwerk Thermomix TM31. Not only is it highly praised by Cook's Illustrated, it's a native Euro product. So for a cool 1000sfr or so, cuilinary heaven can be mine. I'm going to spend all my free time on eBay trying to find a bargain. Wish me luck.

Saturday, August 30, 2008

banana cream pie


bananas in the middle, yum yum

Whatever you're doing, just stop and go make yourself a banana cream pie. It is such a delight. I had forgotten how much I loved this pie. Of course, I've never made the filling from scratch before; when I was a kid, I thought using a pudding mix was making it from scratch. I was surprised how easy to was to make the pudding and it was simply luscious. I made this one for a party, so I didn't nearly eat my fill. I might have to make another one right away so I can eat the whole thing instead of share.


I love the little flecks on vanilla bean in the pudding


unbaked pie crust with the cookie crumbs

Recipe: Banana Cream Pie
Adapted from Cook's Illustrated

1. Make your favorite flaky pie crust, fully bake it, and cool completely. The recipe I used recommended rolling out the crust over graham cracker or butter cookie crumbs to help keep the crust from getting soggy. Just keep sprinkling the crumbs (about 1/2 cup total) over and under the crust as you roll it out.

2. Whisk 1/2 cup plus 2 TB sugar, 1/4 cup cornstarch, and 1/8 tsp salt in medium saucepan. Add 5 egg yolks, then immediately but gradually whisk in 2 cups milk (whole or 2%) and 1/2 cup evaporated milk. Drop in 1/2 vanilla bean, sliced open. Cook over medium heat, stirring frequently at first, then constantly as mixture starts to thicken and begins to simmer, 8 to 10 minutes. Once mixture simmers, continue to cook, stirring constantly, for 1 minute longer. Remove pan from heat; whisk in 2 TB butter. Remove vanilla bean, scrape out seeds, and whisk them back into filling.

3. Pour filling into shallow pan to cool(another pie pan works well). Put plastic wrap directly over filling surface to prevent skin from forming; cool until warm, about 30 minutes. Pour half the warm filling into pie shell. Peel and slice 2 bananas on top of half the filling and top with remaining filling. Once again, place sheet of plastic wrap directly over filling surface. Refrigerate pie until completely chilled, at least 3 hours.

4. Whip 1 cup cream, 2 TB sugar, 1 tsp vanilla to soft peaks. Spread over filling and refrigerate until ready to serve.

Monday, August 25, 2008

plum flame tart


Furthering my attempt to make a least one dessert with each fruit as it comes into season, I made the Plum Flame Tart from The Pie and Pastry Bible. It's so cute and yummy. I don't remember ever seeing an Italian Prune Plum (or Zwetschgen as they are called here) back in CA. But in Switzerland, you can't escape them. Every store has mountains of these little juicy orbs. I love them. I didn't get great pics because I made it for a party and I was in a rush. I only took pics before baking, thus the green, instead of after baking, which was much more purple. I really liked it and would definitely make again.

Anyhoo, I particularly like this pie because it's a cinch to make. Whip up your favorite Pate Sucree (I've included the one I used below), pre-bake it, dust with cornstarch, quarter the plums, line them up in circles, sprinkle with cinnamon-sugar, bake, glaze, done! I have the details below. I did make a few mistakes:

- the recipe said "sprinkle with sugar, cinnamon, and nutmeg", which I did in that order. I thought about mixing them together first, but I decided to follow a literal interpretation of the recipe. This meant there was a not so attractive, visible dusting of cinnamon on the tops of the plums. I'm definitely mixing them together next time before sprinkling.
- in my haste to get to the party, I forgot to glaze it with apricot preserves. This would have made it even prettier and slightly sweeter, which it needed.
- I should have pre-baked the crust a little longer. The instructions said to under-pre-bake so the crust was still a little soft so you can press the plums into it. I thought the crust was underbaked and a little soggy. So I'm doing the full pre-bake next time.


The recipes below are adapted from The Pie and Pastry Bible by Rose Levy Barenbaum

Pâte Sucrée
In a food processor, process 8 TB butter and 1/4 cup sugar about 15 times until sugar disappears. Add 1.5 cups AP flour and 1/8 tsp salt and pulse again 15 times until butter is no larger than small peas. In a small bowl, stir together 1 large egg yolk and 2 TB cream. Add to mixture and pulse just until incorporated, about 8 times. Empty dough onto the counter and knead briefly until it sticks together. Flatten into 6-in disc, wrap in plastic and refrigerate for 10-30 mins. Roll chilled dough out into 11-in circle, about 1/8-in thick. Place in buttered and floured 9.5-in tart pan and freeze for 2 hours. Pre-bake shell, without pie weights, at 425F for 5 mins, prick the puffy parts with a fork, lower heat to 375F and cook 10-15 mins until golden and set, but soft to the touch.

Plum Flame Tart
Preheat over to 350F. Wash, seed and quarter 2 pounds of Italian prune plums. Sprinkle the crust with 1 tsp cornstarch. Starting at the outside edge, arrange the plums in a circle so that they stand upright, with one pointed end pressing into the base of the crust, the other pointed end up, and the skin side leaning against the side of the crust. Continue in concentric circles, fitting in as many plums as possible. Mix together 1/3 cup sugar, 1/2 tsp ground cinnamon, 1/8 tsp nutmeg and sprinkle over plums. Bake 45 mins until crust is golden brown and plums are fork tender. Remove to rack to cool. Heat 1/3 cup apricot preserves in small saucepan until melted and bubbling. Strain into small cup. Cool until no longer hot. Brush plums with melted apricot preserves. Garnish pie with whipped cream. Can be stored at room temp or refrigerated, up to 2 days.

Monday, August 04, 2008

fruit leather


I had way too much fun taking pics of this flexible stuff

My friend Alice suggested that I make fruit leather and who am I to turn down a suggestion? So I picked up 2.5 kilos of apricots at a roadside stand (for 17sfr) and roughly 48 hours later, I have fruit leather. It's not hard, but it's a long wait. After 24 hours drying in the oven, I almost gave up. It seemed like an indulgent waste of energy, keeping the oven on so long. But the thought of throwing away 17sfr of fruit made me persevere. (Realistically, only those growing their own fruit should make their own fruit leather; mine cost about 6sfr per sheet.) And boy am I glad. It's so tasty. Now I just have to stop myself from eating it all in one sitting.

I used this recipe for reference but it made me angry because it says to add 1/2 cup water to the fruit before cooking. I knew this was way too much, but I decided to trust the recipe. I was right: it was way too much!!! My fruit puree was so liquidy that it took days to dry. Only add a tiny bit of water to keep the fruit from initially sticking as you turn on the heat, before the fruit starts releasing its own juices.


ready to eat


rolled up for storage


gotta love that curly-q

Recipe: Fruit Leather

1. Locate your fruit. Roughly 4 cups of fruit will yield one baking sheet of fruit leather. Use any combo of fruit that sounds good to you.

2. Rinse fruit, de-pit and/or stem as necessary, and cut into large chunks. Place fruit in a large saucepan. Add a little water or juice, just enough to keep the fruit from sticking when you initially turn on the heat. The fruit will release it's juices rather quickly. If you add too much, you'll have to cook down the puree for a long time or dry the leather for a really long time (days!).

3. Cook for 10-15 minutes, just until fruit is tender and ready to puree.

4. Puree fruit with food mill or blender. A food mill will also remove the skins and fibers, making for a finer texture.

5. Add sugar, a couple tablespoons of lemon juice, and spices as desired (you can add these while cooking the fruit, but I find it easier to adjust the taste after the fruit has been pureed). The amount of sugar depends on the sweetness of the fruit. My apricots needed tons of sugar (at least 1 cup sugar to 4 cups apricot) and after tasting the final product, I still think I could have added more.

6. Line a baking sheet with plastic wrap. Pour the puree into the baking sheet, about 1/4 inch thick. Any thicker and it will take a lifetime to dry (I only had two baking sheets, so I think I did mine a little too thick, thus increasing the drying time even more). Make sure the plastic wrap doesn't fold over onto the puree. I had trouble with this, so moistened the sides of the pan with a little fruit puree to make the plastic wrap stick to the sides. Worked like a charm. Also, try to keep the plastic wrap from touching the sides of the oven.

7. Place baking sheet in oven at 140F/60C and let it dry until the puree is stiff and has a smooth surface, 12+ hours. Mine took at least 36 hours.

8. When the fruit leather is ready, peel up the plastic wrap off the baking sheet. To eat, peel off the plastic wrap and chomp, chomp, chomp. To store it, you can roll it up (keeping the plastic wrap on the back), put it in an airtight container in the fridge or freezer.

Monday, July 28, 2008

pie crazy


what's summer without a peach pie?

My in-laws graciously brought me lots of goodies on their recent visit, including The Pie and Pastry Bible by Rose Levy Beranbaum. It's a great read and inspiring. So I've been baking a lot of pies. In the process, I've learned three very helpful techniques:

- To make fruit pies less liquidy and more flavorful, Rose recommends mascerating the fruit in sugar, collecting the juices, boiling the juice down into a syrup, and adding the syrup back to the fruit. I love it and will definitely apply this to other recipes besides Rose's.

- If you add too much liquid to pie dough, too much gluten will form, creating a tough crust. Thus most pie crust recipes only add a tablespoon or two of liquid, making a very dry dough that is difficult to roll out. Cook's Illustrated has a clever technique that uses vodka for some of the liquid. Vodka is 40% alcohol, which doesn't form gluten when mixed with flour. But the additional liquid makes the dough more supple and easier to roll out. The vodka evaporates on baking and adds no flavor. I tried it and the dough was a dream to roll out and tasted great, although some of my tasters slightly preferred Rose's crust. (See the recipe and video here)

- When making the pie crust, you need some of the flour to be coated with butter (to ensure flakiness) and some dry (to ensure tenderness), which is why you have to cut the butter into the flour, not mix. But getting a good ratio every time can be difficult, either having too big of butter chunks with lots of dry flour or most of the butter smoothly blended into the flour. To help get a good ratio every time, Cook's recommends mixing the butter with only half the flour, then stirring the remaining dry flour in before adding the liquid. This means exactly half of the flour is totally coated with fat, while the other half the flour is totally dry. I love it because not only is it so darn clever, but it works!


I wanted to stick to fruit pies in summer, but by popular demand, I made this pecan pie. After the first bite, I was so glad I made it.


apricot/raspberry - pretty, tangy and yummy
I used my own apricot preserves to glaze it - yay for me


I didn't get any good photos of this nectarine/raspberry pie, but I thought it was the best of the bunch

Recipe: Single Pie Crust with Vodka
abbreviated from Cook's Illustrated (see original here)

1 1/4 cups unbleached all-purpose flour (6 1/4 ounces)
1/2 teaspoon table salt
1 tablespoon sugar
6 tablespoons cold unsalted butter (3/4 stick), cut into 1/4-inch slices
1/4 cup chilled solid vegetable shortening , cut into 2 pieces
2 tablespoons vodka , cold
2 tablespoons cold water

1. In food processor, mix 3/4 cup flour, sugar and salt together. Add butter and process until homogenous dough just starts to collect in uneven clumps, about 10 seconds. Add remaining 1/2 cup flour and pulse until mixture is evenly distributed around bowl and mass of dough has been broken up, 4 to 6 quick pulses. Empty mixture into medium bowl.

2. Sprinkle vodka and water over mixture. With rubber spatula, use folding motion to mix, pressing down on dough until dough is slightly tacky and sticks together. Flatten dough into 4-inch disk. Wrap in plastic wrap and refrigerate at least 45 minutes or up to 2 days.

3. Use as you would regular pie crust dough, rolling into a 12-in circle about 1/8 thick. Before filling, it should be blind-baked at 435F for 20-25 minutes (removing pie weights after 15 minutes). For all the details, see the original recipe.

Friday, July 18, 2008

scallion pancakes: the snake and the snail


scallion pancakes - an easy snack

I love food friends. My friend Lily, from Shanghai, likes to show me how to make asian food. It's usually so simple, just something I wouldn't think to make. I like that for her, it's regular weekday food, not a party trick. Plus we get to eat on all her lovely asian pottery.

Last time she made Chinese spring rolls, of which I ate about 20 (I'm such a pig!). This week she showed me how to make scallion pancakes (and sushi, but that's for another post). It was so easy and so fun. Her son calls it "the snake and the snail" because that's what it looks like when you roll it up. My picky 4yr old loved them and the next day, begged me to make them again - music to my ears. I'm hoping I can include grated veggies in my next batch to make this a healthy snack.

1. Mix 2 cups flour with 1 cup water (or more or less, just keep the ratio 2:1) until it becomes a smooth ball. The recipe I used had me put the flour in the food processor and pour boiling water through the feed tube as it processed. This was effective, but probably not necessary. The recipe also said to let the dough sit covered for an hour but I used my after about 10 mins with good results.


2. Tear off a section of dough, a bit bigger than a golf ball. Roll it into a thin circle. Brush with oil and sprinkle on sliced spring onions and salt (don't skimp!).

3. Roll up the circle into a snake (as shown above).

4. Then roll up the snake on itself like a snail, tucking the end under one flat side of the circle so the onions don't fall out.


5. Smash the circle flat and roll it out thin again. It might tear a little with some oil and onions peaking out. Don't worry. It'll still taste yummy.

6. Heat a pan to med-high and brush with a little oil. Fry up the pancake, a couple minutes on each side. You want it golden brown and cooked long enough that the inside isn't doughy.

7. Slice and serve.

Wednesday, July 09, 2008

normandie caramels


On our Normandie trip, I saw darling packages of salted caramels everywhere: at tourist sites, at bakeries, at groceries, even at gas stations. I was afraid I might be a sucker for the marketing, but this time the stuff inside was just as good as the outside promised. The caramels were soft, lush, and creamy with a perfect hint of salt. I just wish I had bought more. These are a definite "don't miss" if you happen to be in Normandie.

Posted by Picasa

Friday, June 20, 2008

ravioli


ok these are not ravioli, but tortellini are more photogenic

Inspired by my friend Astrid's posting on fresh pasta, I dusted my pasta machine off and cranked out some ravioli. It was fun and yummy. I shaped some into tortellini because they are just so darn cute. My favorite part was the filling, which I love to eat on its own because the ricotta is so yummy here, so smooth and creamy. (I had some leftover and scrambled it up with some eggs, it was so good!) I learned a couple things:

- use plenty of flour. On previous attempts, my homemade pasta was always stuck together and was extremely difficult to roll out with only two hands (I've recruited my 3yr old to catch pasta while I cranked and fed in the dough - not recommended). But after watching lots of food TV about making pasta, I learned that pasta should be liberally floured at each stage. It works like a charm. I could fold my pasta sheet as it rolled out with no sticking at all.

- roll dough in small batches. Previously, my pasta sheets were so long, they reached across the room and were very unwieldly. I realized that if I just work with smaller bits of dough, the sheets are a manageable length. Seems obvious, I know. But sometimes I follow directions so precisely, thinking there must be a reason for the madness, instead of using common sense.

- wet filling makes for wet pasta. I made my ravioli at mid-day, leaving them on the counter to air-dry, and cooked them for dinner (the recipe said this was ok). After a few hours, the dough started to get soggy and stick to the parchment paper. I think this was because my spinach was a little too wet. I suppose more liberal flouring would have helped a bit there too.

- space ravioli filling closer together than you might think. I thought my filling was too close, but I ended up with lots of pasta between each ravioli, and thus, less ravioli.

- thickness??? The instructions said to roll to #6 on the pasta machine, but I thought the resulting cooked raviolis were much too thick. I'm going to try #7 next time and report on the results.


filling dolloped out and dough moistened, ready for folding


folded over into raviolis, ready for cutting


in squares, ready for tortellini shaping

The following recipes are adapted from How to Cook Everything by Mark Bittman

Pasta
2 cups (10 ounces) all-purpose flour
1 tsp salt
3 eggs

Mound flour on counter and create well in center. Break one egg in the flour well and use fork to beat egg and incorporate into flour. Repeat with other two eggs and mix until all flour is mixed with the eggs. Knead a couple minutes until dough forms a smooth ball. Cut the dough into 4-6 pieces and cover in plastic. One ball at a time, roll pasta out with pasta machine.

Spinach-Ricotta Filling
10 ounces spinach, blanched, drained, cooled and chopped finely (or use frozen - thaw it and drain thoroughly)
1 egg
1 cup ricotta, drained for a few minutes in strainer
1 cup grated Parmesan cheese
salt and pepper
1/2 tsp freshly grated nutmeg

Combine all ingredients. Taste and adjust seasonings as necesary. Use to fill pasta immediately or refrigerate for up to a day before using.

Butter-Sage Sauce
6 tablespoons butter
20 to 20 fresh sage leaves or 1 tablespoon dried whole sage leaves
salt and pepper to taste
1 pound pasta
1 cup grated Parmesan cheese

Bring large pot of water to a boil. Meanwhile, melt butter in saucepan over low heat. Add sage, salt and pepper. Cook until the butter turns a light brown, about 10 minutes. Cook ravioli in boiling water until they float, just a couple minutes. Drain ravioli and place in individual bowls. Spoon sauce over ravioli. Sprinkle with cheese.

Wednesday, June 11, 2008

hot chocolate


There's something about being served hot chocolate in this manner that makes it taste special. This was part of our breakfast in Giverny, France.

Sunday, June 08, 2008

tripe sausage


This time in Normandie I went too far. I like to try new and weird stuff, but this tripe sausage baked over camembert and apples was almost more than I could take. I could smell it coming to the table and I was scared. It wasn't that bad, but it wasn't very good either. I might take a little break from the weird stuff and eat normal stuff I crave.