Wednesday, November 28, 2007

roll it


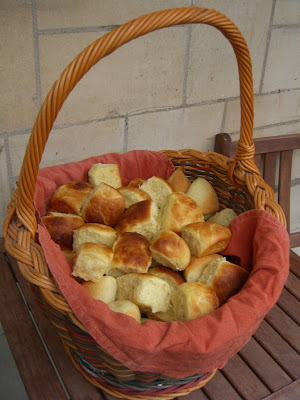
my bread basket makes its once-a-year appearance

We celebrated this Thanksgiving with 50 or so other Americans, buffet style. I was assigned rolls, stuffing and cranberry sauce. I started testing out rolls the week before, different recipes, different shapes. My freezer now has a nice collection that I can break out for emergencies. My favorite was the Cook's Illustrated Best American Dinner Rolls, which were so fluffy and delicious, I wanted to eat them all in one sitting. I also like that the shaped rolls must be refrigerated 24 to 48 hrs, so I don't have to make the dough and shape them on turkey day.


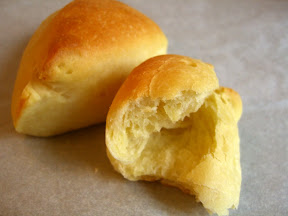
I first baked in 9inch cake pan as suggested
yum, but not pretty when separated


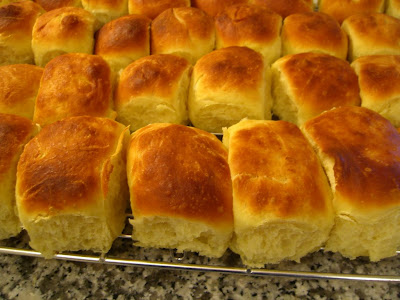
I preferred this mini-loaf shaping


Bread Bible dinner rolls - not sweet enough

These Bread Bible rolls were ok, but not sweet enough and not as flaky as the winner. I did not like the cloverleaf shaping at all. Too much crust, not enough fluffy interior. The most interesting thing was the coloring. I used the "ice in hot pan" steaming method with the ones on the left, but not the ones on the right. Now I'm convinced it makes a difference and will discpline myself to use that method more often to get a golden crust.


another Cooks' recipe - Best Dinner Rolls Made Easy
ok, but not sweet enough

Best American Dinner Rolls - the winner
adapted from Cook's Illustrated
3/4 cup milk
6 TB unsalted butter, melted (plus 2 TB for brushing on rolls before baking)
6 TB sugar
1 1/2 tsp table salt
2 large eggs, room temperature
1 package rapid-rise yeast
3 cups unbleached all-purpose flour (15 ounces)

1. Make dough: Bring milk to boil in small saucepan over medium heat; let stand off heat until skin forms on surface, 3 to 5 minutes. Using soup spoon, skim skin off surface and discard. (Why scald milk?) Transfer milk to bowl of standing mixer and add 6 tablespoons melted butter, sugar, and salt; whisk to combine and let mixture cool. When mixture is just warm to the touch (90 to 100 degrees), whisk in eggs and yeast until combined.

2. Add flour to bowl; using dough hook, mix on low speed on standing mixer until combined, 1 to 2 minutes. Increase speed to medium-low and knead about 3 minutes more; when pressed with finger, dough should feel tacky and moist but should not stick to finger. (If dough is sticky, add another 1 to 3 tablespoons flour.) Continue to knead on medium-low until cohesive, elastic dough has formed (it should clear sides of bowl but stick to bottom), 4 to 5 minutes longer.

3. Transfer dough to lightly floured work surface. Knead dough by hand 1 to 2 minutes to ensure that it is well kneaded. Dough should be very soft and moist but not overly sticky. (If dough sticks excessively to hands and work surface, knead in flour a tablespoon at a time until dough is workable.) Lightly spray medium bowl with nonstick cooking spray. Transfer dough to bowl; lightly coat surface of dough with cooking spray and cover with plastic wrap. Let dough rise in warm, draft-free location until doubled in volume, 2 to 3 hours.

4. Shape rolls: (The original recipe below puts rolls in two 9-inch cake pans, which I did not like because the rolls aren't uniform or pretty when you take them out. I prefer lining them up in a square or rectangular baking dish. To do this, prepare the rolls the same as described below but place in the square/rectangle pan, about four across with sides touching and leaving a little space between rows, as shown in this article.)

Coat two 9-inch round cake pans with cooking spray; set aside. Pat dough into rough 12 by 10-inch rectangle, gently pressing out air; starting from edge farthest from you, roll dough into cylinder. Using palms, roll dough back and forth until cylinder is about 18 inches long and of even thickness. Using bench scraper or chef's knife, cut into 16 evenly sized pieces (or more if you want smaller rolls).

5. Working with one piece at a time and keeping remaining pieces covered with plastic wrap or kitchen towel, form dough pieces into smooth, taut rounds. Set piece of dough on unfloured area of work surface. Loosely cup hand around dough (not directly over it); without applying pressure to dough, move hand in small circular motions. (Tackiness of dough against work surface and circular motion should work dough into smooth, even ball.) Arrange shaped rolls in prepared pans; cover pans with plastic wrap lightly coated with cooking spray, then cover pans securely with foil. Refrigerate at least 24 or up to 48 hours.

6. Bake rolls: Remove foil (but not plastic wrap) from cake pans; let rolls rise in draft-free cool room-temperature location until doubled in volume (rolls should press against each other), 6 to 7 hours. When rolls are nearly doubled in volume, adjust oven rack to lower-middle position and heat oven to 400F (205C). Remove plastic wrap. Brush rolls with 2 tablespoons melted butter; bake until deep golden brown, 14 to 18 minutes. Cool rolls in pans on wire rack about 3 minutes, then invert onto rack; re-invert rolls and cool 10 to 15 minutes longer. Break rolls apart and serve warm.

Tuesday, November 27, 2007

piece of cake


I used some of my small cake flour stash on this birthday cake

I came across this fascinating blog posting about making your own cake flour by simply microwaving regular flour. I haven't tried it yet, but I thought my expat readers might find this useful. If your US cake recipes aren't working so well in Zurich, it might be because of the flour. Unlike regular wheat flour, cake flour is fine-textured, low-protein and bleached. These properties help cakes have a high rise while maintaining a fine, moist texture. This site gives a nice concise definition of cake flour.

As far as I can tell, cake flour is not available in Europe because it's bleached, a process not deemed healthy by food regulators here. But bleaching enables the flour to absorb more moisture, meaning moister cake (or something like that, I'm no expert). Anyway, this microwave method seems promising. Here are links to three articles on the subject:

http://amerrierworld.wordpress.com/2007/10/28/a-question-of-flour/
http://amerrierworld.wordpress.com/2007/10/30/more-questions-of-flour/
http://amerrierworld.wordpress.com/2007/11/06/water-water-everywhere/


devil's food cake with chocolate cream icing
sprinkles courtesy of my 3.5yr old

Monday, November 26, 2007

40 kilos


What do you see?
I see a year's worth of bagels, cookies,
pies, biscuits, muffins, waffles, toast...

A month ago, Migros had a 40% off sale on flour, only 1sfr/kilo instead of 1.70sfr/kilo (that's about $.40/pound instead of $.70/pound). So I put my baby in the bjorn and carted home 40 kilos on my stroller. Why? I do plan to bake a lot. But also, my church strongly encourages emergency preparedness, particularly food and water storage. I'm not doing well in this department. I have a ransacked 72 hour kit, one week of water (1 gallon per person per day), and a small assortment of random can goods collecting dust in the cellar. Occasionally, I get motivated and stock up on whatever happens to be on sale. Forty kilos seemed like a reasonable amount at the time, but now that it has been sitting in my hall for four weeks, I'm not so sure. I've already baked my way through 4 kilos this month, so we'll see if I use it all before the expiration date. I must be more methodical in building up my long-term food supplies.
P.S. Freezing flour for a couple days before storing at room temp will kill any weevils that might already be present in the flour. Here are more tips on storing flour.

Tuesday, November 13, 2007

keeping it real

There will be no photo this time. I'm too embarrassed.

Fueled by my recent bread-making successes, I guess I got a little cocky and a lot careless. I tried the Pain à l'Ancienne again and botched it, resulting in a thin, soft, and mottled crust. So sad. I did a lot of things wrong: I added too much water to the dough, let it sit out too long on the counter, cooked the bread on the lowest rack too far from the heat, didn't put in ice cubes for steam. Ugh.

But today, I really made a mess. I wanted to make this apple and goat cheese tart I saw on foodbeam. Seemed easy enough and I thought I could throw it together quickly while my son ate dinner. Boy, I was wrong. Here are a few of my follies:

- wrong dough. I was in a hurry and I didn't know the German name for puff pastry. I tried to guess by the package pictures. Eliminating pizza dough (that was easy), I selected Kuchenteig with the picture of baked apricots with some sort of crust. I don't know what I bought, but it sure wasn't puff pastry. It was more like cardboard.

- wrong apples. My default baking apple, Granny Smiths, are hard to come by here. And I forgot the recipe called for Pink Ladys (which are a little rare around Zurich right now, although I did see them at Jelmoli today). So this time I asked the farmer's market vendor for a good baking apple. He sold me Boskop, about which I later read this lovely quote: "It is of good size but does not rank high in quality; the texture is somewhat coarse, and the flavor rather too acid for an agreeable dessert apple." I expected the apples to bake down, carmelize, hold their shape. Instead, they fluffed up like puff pastry (at least something fluffed up) and the peels popped off and burnt. They actually tasted quite good but the texture was bizarre.

- frozen cheese. I bought the goat cheese a couple days ago and in that time, it had jostled its way to the back of the fridge. My old skool fridge has temperature issues: the bottom is practically room temp, while anything that touches the back wall freezes. So I went to slice the cheese and the back half of it was frozen. However, it didn't make much difference since it all melted in the oven.

- soft ball instead of sauce. I never trust a recipe on the first time round, so of course, turned up the heat on the sugar/butter sauce to help the carmelization process. I've made lots of tarte tatins and I figured this was what the recipe wanted (although it specifically said, cook on low!). I looked away for a couple minutes and the sauce had suddenly turned into soft-ball caramel candy, which is not very easy to pour over a tart.

Aaaaaaah. I wish I was the type of cook that could go "off book." But I must tediously follow each recipe instruction to the letter with no distractions to get any decent result. So much to learn, so little time.

Saturday, November 10, 2007

sloppy makes perfect - Pain à l'Ancienne baguettes


today's lunch - Pain à l'Ancienne with Roquefort

Fresh off my ciabatta victory, I attempted Pain à l'Ancienne baguettes from The Bread Baker's Apprentice (aka BBA). I'm glad to report I had another scrumptious success. The crust was gorgeous, crisp. The flavor was slightly sweet. The crumb was holey, silky, and just chewy enough. It reminded me of our Paris trip this year, when we got bread from La Grande Épicerie and other fab bakeries in the neighborhood and would simply eat bread with butter and jam for breakfast. Heaven. If only it didn't take a whole day to make bread like this.

to some, this may just be some sloppy dough
but to me, it's a thing of beauty

Apparently "pain à l'ancienne" refers not to a type of bread, but rather a delayed-fermentation technique for making the dough. In this case, I shaped it into rustic baguettes (no rolling this dough), though it can be used for ciabatta, pugliese, foccacia, pizza (I'm very curious how that would turn out), etc. The recipe yields 6 baguettes (it's only good for one day, who can eat 6 in one day?) so I halved the recipe. Here are measurements I used:

- 13.5 oz bread flour (or in my case, Halbweissmehl at 13g protein plus 3 tsp vital wheat gluten)
- 1 1/8 tsp salt
- scant teaspoon of instant yeast
- 9.5 to 12 oz ice cold water (40F) - I used the whole 12 oz

You can find the instructions here (as well as many other places on the web).


after the overnight rise in fridge
followed by 6 hours on the counter


divided in thirds with pastry scraper


placed carefully on parchment paper


puffed up after only a couple minutes in 550F oven


crispy and golden, but my scoring is still terrible
must learn how to use my lamé

Friday, November 09, 2007

best bread I ever made


finally, a ciabatta I can be proud of

I'm so excited that I'm typing this post while eating my ciabatta, dripping olive oil all over the keyboard. It's so good. But more importantly, it hopefully signals a new wonderful phase in my bread-making: a phase where I can actually make artisan bread, not just try. I made ciabatta from The Bread Bible (my new favorite bread book) and it was perfect. The crumb was impossibly light and chewy, the crust golden and crunchy. It's better than any ciabatta I've ever eaten, or at least that I can remember. And I'm absolutely shocked. I've made several attempts at these artisan breads before. Most have been tasty, even pretty, but not anything like what a proper artisan loaf should be. The crumb has been too tight, the crust too soft. My first and only ciabatta attempt last year was so sad, I didn't even eat it.


super holey and lacey crumb


the money shot - see that light shining through

So what happened and will I be able to replicate it? First, I used the vital wheat gluten again (which ups the protein of any flour), which I'm convinced is the key to success. Of course, I'd have to try the recipe again without it to verify my theory. I'm going to bring back so many boxes of this stuff on my next trip to the US. Second, I'm starting to have a better sense of what various doughs should feel like, so I can more comfortably adjust the water/flour as necessary if the dough doesn't feel right. With this ciabatta, I added more water to make it more sticky (so the dough cleared the sides of the mixer bowl, but not the bottom, as instructed by the cook book) and I'm sure this made a difference as well. On the flip side, with my "perfect" bagel dough, I let it be super stiff (as instructed by the cook book), though it seemed so wrong. That paid off as well. Well, with this success, I'm inspired to make every other artisan loaf in the book: pugliese, bagettes, pain l'ancienne, etc. We'll see if I can make this trend.


during shaping, the dough was light and delicate,
I was almost afraid to touch it


after shaping, covered with flour
and full of decorative wrinkles

I'll post the recipe later when I'm done eating the bread (and get some sleep)....OK, here's the recipe, highly abbreviated. I leave out lots of basic bread making things like stir the yeast into the flour before adding the salt (yeast dies on direct contact with salt), etc. For all the detailed ins and outs of bread making, get the book - it's great.
Ciabatta, adapted from The Bread Bible
1. Six hours or up to 3 days ahead, make the biga. In a small bowl/storage container, combine and stir 3-5 mins until smooth:
2.6 oz (75g) unbleached all-purpose flour
1/16 tsp instant yeast
1/4 cup room temp water
Cover bowl tightly with plastic wrap or put lid on storage container and set aside until tripled and filled with bubbles, about 6 hours. Stir it down and use or refrigerate for up to 3 days (remove to room temp for 1hr before using).
2. Mix the dough. In mixer bowl, combine:
4.75 oz (136g) unbleached all-purpose flour
1/4 tsp instant yeast
1/2 tsp salt
1/2 cup water
biga, from above (a scant 1/2 cup)
Using paddle attachment (not dough hook), mix on low speed until all flour is moistened. Then beat at medium-high (#6 on KitchenAid) for 3 minutes, until strands of gluten start to develop. Lower speed to medium (#4) and beat for 2 more minutes. If dough hasn't pulled away from sides of bowl, beat at med-high speed again for a couple minutes. If it's still sticking, beat in a little flour 1 tsp at a time. Dough should be sticky.
3. Let dough rise. Scrape dough into 1 quart/liter lightly oiled container, cover and let rise until tripled, 1.25 to 2 hours.
4. Shape dough and let rise. This is the most critical and most fun part of making ciabatta. Sift lots of flour onto counter, then gently scrape dough onto flour. Sift more flour on top of dough. Push together slightly into rectangle. Using your fingertips, make large, deep dimples in the dough about 1 inch apart, which elongates the dough. Push the sides of the dough together again (this creates the classic wrinkled lines in the crust.) Carefully lift and invert dough onto prepared baking sheet (covered with parchment). Push sides of dough together again. Dough should measure about 4.5in wide and 0.5-1in tall. Cover with large container or loosely with plastic wrap and let rise 1.5-2 hrs, until 1-1.5in tall.
5. Preheat oven to 475F (245C) 1 hr before baking. Use a baking stone if possible. I use an oven peel and slide parchment directly onto baking stone, rather than using a baking sheet. Also, put a baking sheet on oven floor or at lowest level; when you first put the bread in, throw some ice cubes in this pan to create some steam in the oven. This is optional - I rarely do it because my freezer is too small to always keep ice on hand. I did not do it this time.
6. Bake the bread. Bake for 5 mins then reduce oven temp to 450F (230C) and continue baking for 20 minutes or until bread is deeply golde brown and internal temp reads about 214F (100C). Then turn off oven, prop oven door open with a wooden spoon and allow bread to sit for 5 mins.
7. Cool the bread. Remove bread from oven and place on wire rack to cool completely.

Tuesday, November 06, 2007

coconut haystacks


coconut macaroons dipped in chocolate - a little piece of heaven

Oh, coconut macaroons (not to be confused with Parisian macaroons), I love you so. I brought a can of cream of coconut (not to be confused with coconut milk) from the US specifically so I could make these cookies. But like so many special ingredients, I kept waiting for the perfect moment, that never came, to make these gems. I was also frustrated by the fact that I can't get shredded coconut here (only grated and flaked). However, my new friend Jenna (actually, we've only met through email - she'll be moving here soon) generously offered to bring me some supplies, including shredded coconut - yay Jenna! So guess who made coconut macaroons today and ate so many she's sick, sick, sick? Fortunately, I had to save the majority for a cookie exchange. I think I'll have to make another batch this weekend and eat myself sick again. I can't wait!


no needles in these haystacks

Triple Coconut Macaroons
Adapted from Cook's Illustrated
Cream of coconut, available canned, is a very sweet product commonly used in piña colada cocktails. Be sure to mix the can's contents thoroughly before using, as the mixture separates upon standing. If you can't find unsweetened coconut (I've never been able to find it), you can use all sweetened flaked or shredded coconut, but reduce the amount of cream of coconut to ½ cup, omit the corn syrup, and toss 2 tablespoons cake flour with the coconut before adding the liquid ingredients. Makes about 4 dozen 1-inch cookies.

1 cup cream of coconut
2 tablespoons light corn syrup
4 large egg whites
2 teaspoons vanilla extract
1/2 teaspoon table salt
3 cups unsweetened, shredded, desiccated coconut (about 8 ounces)
3 cups sweetened shredded coconut (or flaked), about 8 ounces

1. Preheat oven to 375F (190C). Line two cookie sheets with parchment paper and lightly spray parchment with nonstick vegetable cooking spray.

2. Whisk together cream of coconut, corn syrup, egg whites, vanilla, and salt in small bowl; set aside. Combine unsweetened and sweetened coconuts in large bowl; toss together, breaking up clumps with fingertips. Pour liquid ingredients into coconut and mix with rubber spatula until evenly moistened. Chill dough for 15 minutes.

3. Drop heaping tablespoons of batter onto parchment-lined cookie sheets, spacing them about 1 inch apart. Form cookies into loose haystacks with fingertips, moistening hands with water as necessary to prevent sticking. Bake until light golden brown, about 15 minutes, turning cookie sheets from front to back and switching from top to bottom racks halfway through baking.

4. Cool cookies on cookie sheets until slightly set, about 2 minutes; remove to wire rack with metal spatula.
Related Posts Plugin for WordPress, Blogger...