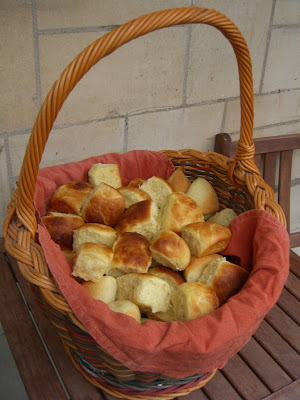
my bread basket makes its once-a-year appearance
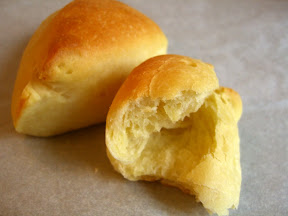
We celebrated this Thanksgiving with 50 or so other Americans, buffet style. I was assigned rolls, stuffing and cranberry sauce. I started testing out rolls the week before, different recipes, different shapes. My freezer now has a nice collection that I can break out for emergencies. My favorite was the Cook's Illustrated Best American Dinner Rolls, which were so fluffy and delicious, I wanted to eat them all in one sitting. I also like that the shaped rolls must be refrigerated 24 to 48 hrs, so I don't have to make the dough and shape them on turkey day.

I first baked in 9inch cake pan as suggested
yum, but not pretty when separated

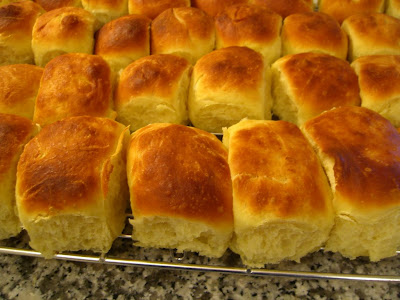
I preferred this mini-loaf shaping

Bread Bible dinner rolls - not sweet enough
These Bread Bible rolls were ok, but not sweet enough and not as flaky as the winner. I did not like the cloverleaf shaping at all. Too much crust, not enough fluffy interior. The most interesting thing was the coloring. I used the "ice in hot pan" steaming method with the ones on the left, but not the ones on the right. Now I'm convinced it makes a difference and will discpline myself to use that method more often to get a golden crust.
Best American Dinner Rolls - the winner
adapted from Cook's Illustrated
3/4 cup milk
6 TB unsalted butter, melted (plus 2 TB for brushing on rolls before baking)
6 TB sugar
1 1/2 tsp table salt
2 large eggs, room temperature
1 package rapid-rise yeast
3 cups unbleached all-purpose flour (15 ounces)
1. Make dough: Bring milk to boil in small saucepan over medium heat; let stand off heat until skin forms on surface, 3 to 5 minutes. Using soup spoon, skim skin off surface and discard. (Why scald milk?) Transfer milk to bowl of standing mixer and add 6 tablespoons melted butter, sugar, and salt; whisk to combine and let mixture cool. When mixture is just warm to the touch (90 to 100 degrees), whisk in eggs and yeast until combined.
2. Add flour to bowl; using dough hook, mix on low speed on standing mixer until combined, 1 to 2 minutes. Increase speed to medium-low and knead about 3 minutes more; when pressed with finger, dough should feel tacky and moist but should not stick to finger. (If dough is sticky, add another 1 to 3 tablespoons flour.) Continue to knead on medium-low until cohesive, elastic dough has formed (it should clear sides of bowl but stick to bottom), 4 to 5 minutes longer.
3. Transfer dough to lightly floured work surface. Knead dough by hand 1 to 2 minutes to ensure that it is well kneaded. Dough should be very soft and moist but not overly sticky. (If dough sticks excessively to hands and work surface, knead in flour a tablespoon at a time until dough is workable.) Lightly spray medium bowl with nonstick cooking spray. Transfer dough to bowl; lightly coat surface of dough with cooking spray and cover with plastic wrap. Let dough rise in warm, draft-free location until doubled in volume, 2 to 3 hours.
4. Shape rolls: (The original recipe below puts rolls in two 9-inch cake pans, which I did not like because the rolls aren't uniform or pretty when you take them out. I prefer lining them up in a square or rectangular baking dish. To do this, prepare the rolls the same as described below but place in the square/rectangle pan, about four across with sides touching and leaving a little space between rows, as shown in this article.)
Coat two 9-inch round cake pans with cooking spray; set aside. Pat dough into rough 12 by 10-inch rectangle, gently pressing out air; starting from edge farthest from you, roll dough into cylinder. Using palms, roll dough back and forth until cylinder is about 18 inches long and of even thickness. Using bench scraper or chef's knife, cut into 16 evenly sized pieces (or more if you want smaller rolls).
5. Working with one piece at a time and keeping remaining pieces covered with plastic wrap or kitchen towel, form dough pieces into smooth, taut rounds. Set piece of dough on unfloured area of work surface. Loosely cup hand around dough (not directly over it); without applying pressure to dough, move hand in small circular motions. (Tackiness of dough against work surface and circular motion should work dough into smooth, even ball.) Arrange shaped rolls in prepared pans; cover pans with plastic wrap lightly coated with cooking spray, then cover pans securely with foil. Refrigerate at least 24 or up to 48 hours.
6. Bake rolls: Remove foil (but not plastic wrap) from cake pans; let rolls rise in draft-free cool room-temperature location until doubled in volume (rolls should press against each other), 6 to 7 hours. When rolls are nearly doubled in volume, adjust oven rack to lower-middle position and heat oven to 400F (205C). Remove plastic wrap. Brush rolls with 2 tablespoons melted butter; bake until deep golden brown, 14 to 18 minutes. Cool rolls in pans on wire rack about 3 minutes, then invert onto rack; re-invert rolls and cool 10 to 15 minutes longer. Break rolls apart and serve warm.


4 comments:
OH YUUUUUUM!!!! I love love love rolls. The delicate fluffyness of them melting in my mouth with butter or Grandma's homemade raspberry jam.
Hey Tanya!
Your rolls look absolutely gorgous!!! I've got an important question to you! I'm from Austria and so I can`t login the website to get the recipe! Would you be so kind to send me the recipe per mail? I really need this recipe because I'm googeling the right dinner rolls for two days now and I'm not satisfied with the results I've found so far! My adress is: Ninah7@gmx.at
Thanks for helping!
Nina
Welcome Nina. I added the recipe to the post. Good luck!
Hi Tanya!
Thank you very much for your speedy answer! I'm just looking forward to baking these rolls tomorrow! Hopefully they'll turn out as well as yours!
Best wishes to switzerland!
Bye,
Nina
Post a Comment