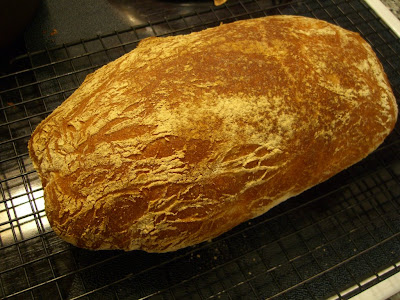
finally, a ciabatta I can be proud of
I'm so excited that I'm typing this post while eating my ciabatta, dripping olive oil all over the keyboard. It's so good. But more importantly, it hopefully signals a new wonderful phase in my bread-making: a phase where I can actually make artisan bread, not just try. I made ciabatta from The Bread Bible (my new favorite bread book) and it was perfect. The crumb was impossibly light and chewy, the crust golden and crunchy. It's better than any ciabatta I've ever eaten, or at least that I can remember. And I'm absolutely shocked. I've made several attempts at these artisan breads before. Most have been tasty, even pretty, but not anything like what a proper artisan loaf should be. The crumb has been too tight, the crust too soft. My first and only ciabatta attempt last year was so sad, I didn't even eat it.

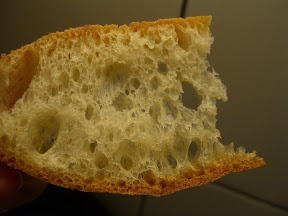
super holey and lacey crumb

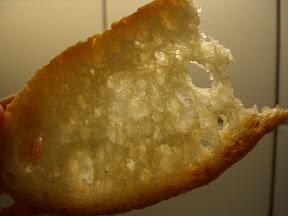
the money shot - see that light shining through
So what happened and will I be able to replicate it? First, I used the vital wheat gluten again (which ups the protein of any flour), which I'm convinced is the key to success. Of course, I'd have to try the recipe again without it to verify my theory. I'm going to bring back so many boxes of this stuff on my next trip to the US. Second, I'm starting to have a better sense of what various doughs should feel like, so I can more comfortably adjust the water/flour as necessary if the dough doesn't feel right. With this ciabatta, I added more water to make it more sticky (so the dough cleared the sides of the mixer bowl, but not the bottom, as instructed by the cook book) and I'm sure this made a difference as well. On the flip side, with my "perfect" bagel dough, I let it be super stiff (as instructed by the cook book), though it seemed so wrong. That paid off as well. Well, with this success, I'm inspired to make every other artisan loaf in the book: pugliese, bagettes, pain l'ancienne, etc. We'll see if I can make this trend.

during shaping, the dough was light and delicate,
I was almost afraid to touch it

after shaping, covered with flour
and full of decorative wrinkles
I'll post the recipe later when I'm done eating the bread (and get some sleep)....OK, here's the recipe, highly abbreviated. I leave out lots of basic bread making things like stir the yeast into the flour before adding the salt (yeast dies on direct contact with salt), etc. For all the detailed ins and outs of bread making, get the book - it's great.
Ciabatta, adapted from The Bread Bible
1. Six hours or up to 3 days ahead, make the biga. In a small bowl/storage container, combine and stir 3-5 mins until smooth:
2.6 oz (75g) unbleached all-purpose flour
1/16 tsp instant yeast
1/4 cup room temp water
Cover bowl tightly with plastic wrap or put lid on storage container and set aside until tripled and filled with bubbles, about 6 hours. Stir it down and use or refrigerate for up to 3 days (remove to room temp for 1hr before using).
2. Mix the dough. In mixer bowl, combine:
4.75 oz (136g) unbleached all-purpose flour
1/4 tsp instant yeast
1/2 tsp salt
1/2 cup water
biga, from above (a scant 1/2 cup)
Using paddle attachment (not dough hook), mix on low speed until all flour is moistened. Then beat at medium-high (#6 on KitchenAid) for 3 minutes, until strands of gluten start to develop. Lower speed to medium (#4) and beat for 2 more minutes. If dough hasn't pulled away from sides of bowl, beat at med-high speed again for a couple minutes. If it's still sticking, beat in a little flour 1 tsp at a time. Dough should be sticky.
3. Let dough rise. Scrape dough into 1 quart/liter lightly oiled container, cover and let rise until tripled, 1.25 to 2 hours.
4. Shape dough and let rise. This is the most critical and most fun part of making ciabatta. Sift lots of flour onto counter, then gently scrape dough onto flour. Sift more flour on top of dough. Push together slightly into rectangle. Using your fingertips, make large, deep dimples in the dough about 1 inch apart, which elongates the dough. Push the sides of the dough together again (this creates the classic wrinkled lines in the crust.) Carefully lift and invert dough onto prepared baking sheet (covered with parchment). Push sides of dough together again. Dough should measure about 4.5in wide and 0.5-1in tall. Cover with large container or loosely with plastic wrap and let rise 1.5-2 hrs, until 1-1.5in tall.
5. Preheat oven to 475F (245C) 1 hr before baking. Use a baking stone if possible. I use an oven peel and slide parchment directly onto baking stone, rather than using a baking sheet. Also, put a baking sheet on oven floor or at lowest level; when you first put the bread in, throw some ice cubes in this pan to create some steam in the oven. This is optional - I rarely do it because my freezer is too small to always keep ice on hand. I did not do it this time.
6. Bake the bread. Bake for 5 mins then reduce oven temp to 450F (230C) and continue baking for 20 minutes or until bread is deeply golde brown and internal temp reads about 214F (100C). Then turn off oven, prop oven door open with a wooden spoon and allow bread to sit for 5 mins.
7. Cool the bread. Remove bread from oven and place on wire rack to cool completely.

10 comments:
What incredible holes! I'm very impressed. I look forward to learning from you when we meet on Monday!
Wow- thanks for showing this lovely bread...I can't wait for the recipe. This looks so very, very good!
Welcome Wendy. Per your request, I added the recipe. Good luck!
I have been gaking bread for 25 years and have yet to bake a good cibatta.I am excited to try this. Do I need the vital wheat stuff??
Welcome Joseph. I haven't made the this ciabatta recipe without the vital wheat gluten. If you have access to bread flour, I'd just try with that. I only have Halbweissmehl at 13g protein and I don't even know what Halbweissmehl even is - half whole wheat? Does that mean there's bran in it disrupting the gluten forming process? Who knows? Anyway - try it and let me know how it turns out.
Tanya, this looks great. One question though...do you end up using the whole biga, or just part? It appears to be omitted in the main recipe. We are told to make the biga, but never to use it. :)
As a side note; since I can't get the Vital Wheat Gluten until next time I go back to the States (I'm in Luzern now), I'm going to try this with Baurenmehl. I'll let you know how it turns out.
Hi Chris - sorry about the error in the recipe. You add the whole biga (a scant 1/2 cup) when you mix the dough in step 2. Good luck! Let me know how it turns out with the Bauernmehl.
Thanks. I did make the ciabatta this weekend with Bauernmehl, and it turned out alright. The recipe worked great, it looked right, but it ended up being a little too "wheaty" for me. Definitely the way to go is with the vital wheat gluten...I missed that lovely, long-developed flavor that ciabatta has because it was overwhelmed by the grain. Still, a good bread and a worthy experiment.
Hi I love you blog and like you I live in Zurich and enjoy cooking and exploring food options.
In an earlier post about bread you mentioned that it is possible to buy Vital Gluten online for Breadmaking. However, the link didn't work so I wondered if you could tell me where you found it - I would love to get hold of some. Thanks so much E.
Re: vital wheat gluten. Yes, I noticed awhile ago that the Low Carb Shop is no more. We'll both have to be on the lookout for vital wheat gluten. I'll let you know if I find some in CH. I've heard that you can ask at local bakeries and they will sell you flour and possibly VTG, but I'm so shy. Maybe I'll try that. FYI, the German word for it is Weizenkleber.
Post a Comment