I've got another gadget for you: the Cuisipro thermometer whisk. As you may have noticed, I love measuring things. When making custards, you have to constantly whisk it and monitor the temperature so it doesn't go above 180F and curdle the eggs. This cutie combines the two functions, with a thermometer built into the whisk. Mysteriously, every internet site I checked was out of stock. I searched for it on the internet for over a year and finally found one for sale last November on eBay. I snatched it up right quick and promptly made some pies.
Showing posts with label gadget. Show all posts
Friday, January 23, 2009
constant temperature
I've got another gadget for you: the Cuisipro thermometer whisk. As you may have noticed, I love measuring things. When making custards, you have to constantly whisk it and monitor the temperature so it doesn't go above 180F and curdle the eggs. This cutie combines the two functions, with a thermometer built into the whisk. Mysteriously, every internet site I checked was out of stock. I searched for it on the internet for over a year and finally found one for sale last November on eBay. I snatched it up right quick and promptly made some pies.
right on time
Another "absolute necessary" kitchen tool: my new timer, the Polder 898-90 Clock Timer Stopwatch (rec'd by Cook's). I hate my old timer (also rec'd by Cook's) because the stupid start/stop button is so loose that I have to hit it a few times before it takes and the thermometer feature is poorly calibrated. Why I love my new timer:
- I can type in the time with the numbers, instead of repeatedly pushing an "up" button (really annoying when I need 50 mins).
- I can type in exact seconds, if I want to be especially precise.
- It has a "count up" feature, like a stopwatch, so I can time how long something is happening (like when I want to leave something in the oven a few more minutes and keep checking it - I can just start the stopwatch to track the time instead of constantly resetting the timer to 1 min.
- It's super small so it fits in my pocket.
- It has a string, so I can hang it around my neck.
One complaint: the beep is extremely loud (and not adjustable), but it does happily entertain my toddler so I'll look on the bright side.
Wednesday, January 14, 2009
it's a circus
In addition to all the kitchen gadgets I ordered myself, my step-mom brought several more as Christmas gifts and I'm having great fun using them. She brought this cute animal crackers kit from Williams-Sonoma and my 4yr old has been very anxious to put it to good use. I was a little skeptical as kits like this often look very cute but don't work very well. But happily, I was wrong; it was fun and the cookies are yummy.
The cutters work with a spring action. First you press the cutter into the dough, then you lift the cutter with the dough still inside and set the cutter down on your baking sheet. Then you press the lever down to make the impression, holding the cutter down on the sheet. Then press the lever and life the cutter to release the dough. It took some practice to make the impressions deep enough but not too deep, going all the way through. The method is a little fussy and my 4yr old got bored after one sheet. But overall, I liked the kit and definitely liked the results.
The recipe comes on the back of the box (and on their website) and the only change I would make is to reduce the cooking time from 14-16mins to 9-10mins. At 14mins, mine were positively burnt (I was frantically cooking dinner and wasn't watching them closely). Also, I skip the whole 2hrs in the fridge thing. I just roll my out immediately after mixing and stick it outside in the below zero weather for 10mins and then start cutting. Little boys just can't wait all day for cookies.
absolutely "pourfect" commercial break
More gadgets... I saw these "Pourfect" bowls promoted on Rose Levy Beranbaum's blog and immediately put them on the top of my wish list. The bowls cleverly solve one big headache: pouring ingredients into my kitchen aid, particularly while it's running. With a regular bowl, the contents spread out across the bowl lip, forcing me to slosh the bowl side to side to keep the contents from spilling out the sides. In contrast, the Pourfect bowls are oblong with a pronounced channel and wings on the pouring side so the contents pour straight out and nothing falls out the side. I was a little put-off by the infomercial marketing style of their website, especially the videos. But I was pretty quickly convinced, and in true late night infomerical fashion, I bought the whole kit and caboodle: 6 bowls and 3 measuring beakers. And I'm not sorry. I love them and use them all the time. OK, enough of the promo and back to baking!
Thursday, November 20, 2008
weigh it
isn't it important to know that a piece of paper weighs .15 ounce?
My new favorite gadget (I never tire of saying this) is my new scale, the KD-8000 from MyWeigh, which I bought here for $50. Thanks Kim for bringing it back from the US!
So, how do I love thee? Let me count the "weighs":
- Ounces are shown as a decimal, not a fraction. My old scale used fractions and only did increments of 1/8. So if I needed 1/3, I had to guess.
- It's super-sensitive to 1 gram. With my old scale, I had to periodically push down on it as I added small amounts of flour so it would register the small weight change.
- The auto-off is configurable. I can't tell you how many times my old scale turned off in the middle of me weighing something.
- The max weight is 17 pounds. My old scale's max was 5 pounds, which is ridiculous if my huge glass bowl already weighs 2 pounds.
- It has the option to show the weight in ounces, not pounds & ounces. This means if I need 19.5 ounces of flour, I don't have to mentally convert that to 1 pound 3.5 ounces. (Yes, I should just use grams but I haven't translated all my old American recipe books quite yet.)
- It even has the super fancy "baker's percentage" feature, which allows you to weigh the flour and then show all subsequent measurements as a percentage of the flour weight. I may never use this feature but I love that it's there.
Saturday, May 31, 2008
quick access
I saw this container in a friend's kitchen and immediately went to IKEA to get my very own (50sfr). It has five heavy duty glass containers in a wood frame. Mine gives me quick access to salt, kosher salt, flour, sugar, and hot chocolate mix. I can easily get a couple teaspoons of these ingredients without hauling out my huge storage containers. It even holds enough flour make few batches of pancakes. I love it!
Sunday, December 16, 2007
falafel in no time
My husband brought me back a falafel maker from his trip to Jordan. I love that he thought to bring me a kitchen gadget. He's the best and so is this falafel maker. No more tedious quenelle forming and lots of uniform fried nuggets in no time. Ty said the cooks in Jordan would pop falafel into oil super fast, spraying oil all over their hands, making 100 in the time I make 10. I go slow and methodical, like all my cooking.

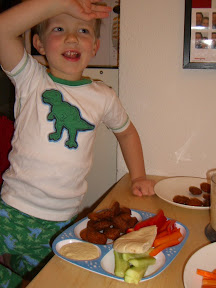
my son always loads up his plate when we have falafel and veggies
My son loves falafel so this is one of our favorite nutritious and easy meals: hummus, sliced veggies (carrots, cucumber, peppers), falafel, and pita. Sometimes I'll make a little diced tomato, cucumber, yogurt salad to accompany.
I can't easily get prepared hummus here so I started making my own, which couldn't be easier and is super yum. I use the Cook's Illustrated recipe. I get the Tahini at Reformhaus on Renweg or at Jelmoli near the Mexican food section. For falafel, I just get the powdered mix, available at most health food stores. You add water, wait a few minutes, then fry it up - remember 360F is the proper oil temp for frying.
Hummus
Makes about 2 cups, serving 8 to 10
I can't easily get prepared hummus here so I started making my own, which couldn't be easier and is super yum. I use the Cook's Illustrated recipe. I get the Tahini at Reformhaus on Renweg or at Jelmoli near the Mexican food section. For falafel, I just get the powdered mix, available at most health food stores. You add water, wait a few minutes, then fry it up - remember 360F is the proper oil temp for frying.
Hummus
Makes about 2 cups, serving 8 to 10
(15 ounce) can chickpeas , drained and rinsed
1 medium clove garlic ,minced or pressed through a garlic press
3/4 teaspoon table salt
pinch cayenne pepper
3 tablespoons lemon juice , from 1 large lemon
1/4 cup tahini
1/4 cup virgin olive oil
1/4 cup water
Process all of the ingredients in a food processor until smooth, about 40 seconds. Transfer the hummus to a serving bowl, cover with plastic wrap, and chill until the flavors meld, at least 30 minutes; serve cold. (The hummus can be refrigerated for up to 2 days.)
Tuesday, December 04, 2007
rolling sticks

exactly 5mm - I love being precise
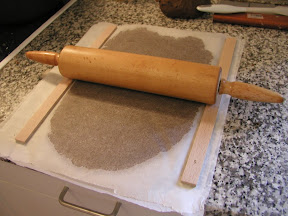
My new favorite low-tech gadget is these rolling pin sticks that ensure your dough is rolled evenly to a specific thickness. They come in various sizes like 1/8 in, 1/4in, 1/2in, etc. You place them on either side of the dough and roll your rolling pin over them and the dough. No more uneven dough, no more guessing how tall the dough is. These are called Teighölzer in Zurich and I got them at Manor (although I heard they are available at Migros, etc.). You can also use rolling pin rings, basically rubber bands of various thicknesses that slide on the end of your rolling pin.
Also, if you aren't rolling your dough between parchment paper, start today. No more dough sticking to the counter and no more extra counter flour in your dough. Just roll your super sticky dough between the parchment, stick it in the fridge or freezer for awhile. When firm, take it out to cut or manipulate as needed. If your dough has lots of butter - act fast. My sugar cookies and gingerbread dough go from ice cold to practically liquid in under five minutes.

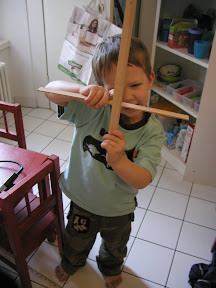
rolling pin sticks also double as a great toy
Wednesday, July 18, 2007
electric boogaloo
Making pancakes in a skillet is tricky work, especially on a stupid, horrible electric stovetop (after nine years of gas cooking, zurich has thrown me back in the dark ages - argh). Even with my infrared noncontact thermometer to monitor the heat, it's practically impossible to maintain the necessary constant 350F to consistently achieve evenly browned, fluffy pancakes. Plus, a skillet only fits three pancakes at a time, so I have to stand at the stovetop, while everone else eats. Either I gobble down my pancakes at the counter or run back and forth from the table every couple minutes to check the pancakes. Yes, I could store the pancakes in the oven and serve them all at once. But for me, pancakes must be eaten straight off the griddle or not at all. Call me crazy.
Despite my growing kitchen appliance storage nightmare, I finally decided to add an electric griddle to my collection. Easier said than done, at least in Switzerland. Not only are none of the brands lauded by good ole Cook's Illustrated available here, the few store workers and civilians I've asked don't even know what I'm talking about. They usually point me in the direction of the raclette grills, which I briefly considered in my desparation but wisely resisted. Fortunately, my trusty resourcer (and husband) worked his magic and found the Princess Table Chef. It's marketed more for Teppan Yaki, but it's perfect for pancakes. Now in no time, I can crank out breakfast for a crowd, or at least for 2.5 people that eat like a crowd (the .5 is my 3yr old). And it's even 220V, so I don't have to use the transformer -yay!
This bacon picture reminds me of the time I ate a pound of bacon in one sitting. My best friend's family had 8 kids, so obviously her mom cooked large amounts of food. Two pounds of bacon at breakfast was a pretty normal occurance. One morning (I was around 15), I was just chatting at the breakfast table, downing one piece of bacon after another, while her mom was making the other food. Without realizing what a little piggy I was being, I had soon polished off half the platter. Embarrassing and gross. I was rightfully mocked for months. Fortunately, I don't have the appetite I once had or my real belly would look more like my pregnant one.
Light & Fluffy Pancakes Recipe
I used to hate pancakes (why eat a pancakes, when you can eat a waffle instead), but this recipe from Cook's Illustrated changed my mind. It's not so special. Alton Brown uses the exact same recipe for his pancake mix. If cooked at the proper temperature (this is critical!!!), they are consistently fluffy and delicious. Happy flipping.
Serves 3 to 4 (about eight 3-inch pancakes)
1 cup unbleached all-purpose flour
2 teaspoons granulated sugar
1/2 teaspoon table salt
1/2 teaspoon baking powder
1/4 teaspoon baking soda
3/4 cup buttermilk
1/4 cup milk (plus an extra tablespoon or so if batter is too thick)
1 large egg, separated
2 tablespoons (1 oz) unsalted butter, melted
vegetable oil (for brushing griddle)
2 teaspoons granulated sugar
1/2 teaspoon table salt
1/2 teaspoon baking powder
1/4 teaspoon baking soda
3/4 cup buttermilk
1/4 cup milk (plus an extra tablespoon or so if batter is too thick)
1 large egg, separated
2 tablespoons (1 oz) unsalted butter, melted
vegetable oil (for brushing griddle)
1. Mix dry ingredients in medium bowl. Pour buttermilk and milk into 2-cup Pyrex measuring cup. Whisk in egg white; mix yolk with melted butter, then stir into milk mixture. Dump wet ingredients into dry ingredients all at once; whisk until just mixed (don't overmix!!! lumps are ok).
2. Meanwhile, heat griddle or large skillet over strong medium-high heat. Brush griddle generously with oil. When water splashed on surface confidently sizzles, pour batter, about 1/4 cup at a time, onto griddle, making sure not to overcrowd. When pancake bottoms are brown and top surface starts to bubble, 2 to 3 minutes, flip cakes and cook until remaining side has browned, 1 to 2 minutes longer. Re-oil the skillet and repeat for the next batch of pancakes.
For extra fun, treat yourself by sprinkling a few chocolate chips on the pancakes after ladling out the batter. Melted chocolate and maple syrup are a scrumptious combo.
Saturday, June 02, 2007
ice, ice baby
Oh, Gefrierschrank, I love you so.
This may not be an exciting sight to most, but to me, this is one of the most beautiful things I've seen in a long, long time. After years of economizing the miniscule real estate of the in-fridge ice box (which was usually more freezer ice than food), I've finally upgraded to a standalone freezer, happily humming along in my cellar.
I bought it for a mere 110sfr off Ricardo.ch (the swiss eBay). Since it was all in German, I wasn't exactly sure what I was bidding on or how I was expected to pay. After I placed my bid, I suddenly realized the item was called a "Tiefkuhlschrank", not a "Gefrierschrank" so maybe I was buying a fridge not a freezer. (Google translation couldn't help, but Leo did - thanks Leo). A last minute bidder pushed the price up 30sfr in 5sfr increments, making my weak non-gambler heart race. But I was the winner!
Almost everyone I know has one of these to store cheap, bulk food from discount groceries in Germany. I'm more interested in freezing regular stuff like:
- homemade chicken stock, bread, pizza dough, tamales, pasta sauce, ice cream, cookie dough
- nuts and butter, so I can keep more in stock without it going rancid if I don't bake for awhile
- frozen fruit and veggies, for emergencies
- ice, so I can actually do ice baths for my custards
Before... only room for special treats:
ice cream, ice cream maker, one ice cream sandwich,
five leftover cream puffs, cookie dough
ice cream, ice cream maker, one ice cream sandwich,
five leftover cream puffs, cookie dough
Tuesday, March 13, 2007
more gadgets
Here are two more of my favorite kitchen gadgets...
My garlic mincing skills have much to be desired, so I typically use a garlic press instead (yes, I know the flavor is different). My old garlic presses were really hard to press - I often had to wedge it against the counter and throw my whole weight against it. So I upgraded to the Zyliss Susi Deluxe garlic press, which I love! It's easy to press, even easier to clean and I don't have to peel the cloves before pressing. Unfortunately, this model is out of production now, but here's a review of the new Zyliss models.
My newest "gadget" is a flour duster, for dusting countertops before kneading or rolling out dough. Before I would simply use my hands or a spoon to spread flour lumps around, which always resulted in much too much flour, unevenly distributed. The duster gives a even, thin layer. It's a simple, silly thing but it makes me a happier baker.
Tuesday, February 27, 2007
can can
My new favorite gadget: the safe edge can opener. Yes, I get excited by little things. This can opener magically removes the top without leaving any sharp edges. The top can even fit back on for temporary storage. I saw one demo'd at a Tupperware party; but at 50CHF, I wasn't quite sold. I found this Zyliss model at Coop for about 25CHF and it's my new best friend.
Subscribe to:
Posts (Atom)